Techniqued- Technoloy, Review and Tutorials
  • Android
  • Freewares
  • Tutorial
  • Windows 11
  • macOS
No Result
View All Result
Techniqued- Technoloy, Review and Tutorials
  • Android
  • Freewares
  • Tutorial
  • Windows 11
  • macOS
No Result
View All Result
Techniqued- Technoloy, Review and Tutorials
No Result
View All Result

Create a Windows 7 Bootable USB

Nirmal by Nirmal
March 1, 2011
in Freewares
11
Share on FacebookShare on Twitter

If you are planning to install Windows 7, you can always do that using the DVD, but it is also useful to carry a bootable USB drive in case you need to install it on a PC where you don’t have a DVD drive or not having access to it. Bootable USB is a free application which allows you to create a bootable drive to install Window 7, Windows Vista and Windows Server 2008. This simple tool can easily create a bootable drive for installing Windows 7.
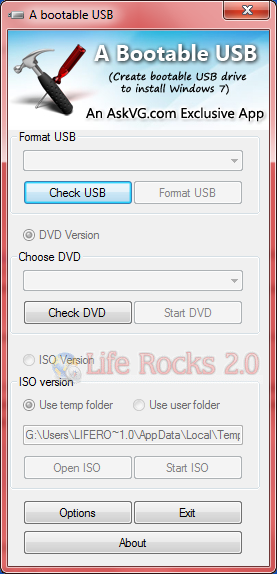
bootable USB

The utility is very simple to use and you will need a 4GB USB drive, the ISO image of the OS (Windows 7 or Vista or Server 2008) and the application should be run on Vista or Windows 7 or Server 2008. The utility has 4 steps to create the bootable USB;

  • Check USB drive to see if its connected
  • Format USB drive
  • Choose DVD or ISO image (To copy the required files to USB drive)
  • Start the process to create bootable USB drive

Bootable USB is a very useful utility which comes handy for the installation of Windows 7.

Download Bootable USB

Tags: Bootable USBFreewaresUSB DrivesWindows 7
ShareTweetSendSend
Previous Post

Twitter in Outlook with TwInbox

Next Post

Download Norton Antivirus 2010 Beta

Related Posts

Freewares

How to Password Protect Folders in Windows 11

March 15, 2023
Freewares

3 Best Free Video Editors for YouTube [2023]

January 20, 2023
Freewares

Completely Uninstall any app from macOS using AppCleaner

December 17, 2022
Freewares

How to Check your Mac’s CPU Temperature

December 13, 2022
Freewares

How to Block Pop-up windows in apps in Windows 11

December 6, 2022
Freewares

How to Monitor Programs Auto-Starting in Windows 11

November 23, 2022

Comments 11

  1. Sathyavrathan PK says:
    14 years ago

    nice one….thanksji…!!

    Reply
  2. VG says:
    14 years ago

    Thanks for posting. 🙂

    Reply
  3. Prince says:
    14 years ago

    Hi Nirmal cheta! Your story is actually amazing… I have a doubt… is it legal to create an unattended CD/DVD of Windows for personal use?

    Reply
  4. Addy says:
    14 years ago

    Seems you need Vista or higher, just to run this program 🙁

    Reply
  5. Nirmal says:
    14 years ago

    @Addy,
    Yes, you will need Vista, Win 7 or Server 2008 to run this application.

    Reply
  6. Delro says:
    14 years ago

    Thanks for posting!

    I’ve used a less integrated method by blogsdna for my Windows 7 install (coming from XP).

    I guess I’ll be using this now to do 7 upgrades!

    Reply
  7. Anish K.S says:
    14 years ago

    Thanks nirmal, will check it

    Reply
  8. Pallab says:
    14 years ago

    Thanks for this awesome app. Till now I was using the manual way.

    Reply

Leave a Reply Cancel reply

Your email address will not be published. Required fields are marked *

This site uses Akismet to reduce spam. Learn how your comment data is processed.


Latest Articles

How to Check Your Data Usage on Android and iPhone

How to Move or Copy Email From One Gmail Account to Another

How to Password Protect Folders in Windows 11

How to Enable Reading Mode on Android

How to Enable Firewall on macOS Ventura

How to Reset Graphics Driver on Windows 11

Techniqued- Technoloy, Review and Tutorials

© 2021 Techniqued - Technology, Tips, Tricks and Reviews

Navigate Site

  • About Us
  • Advertise with us
  • Contact Us
  • Copyright Policy
  • Disclaimer

Follow Us

No Result
View All Result
  • Android
  • Freewares
  • Tutorial
  • Windows 11
  • macOS

© 2021 Techniqued - Technology, Tips, Tricks and Reviews

This website uses cookies. By continuing to use this website you are giving consent to cookies being used. Visit our Privacy and Cookie Policy.