Techniqued- Technoloy, Review and Tutorials
  • Android
  • Freewares
  • Tutorial
  • Windows 11
  • macOS
No Result
View All Result
Techniqued- Technoloy, Review and Tutorials
  • Android
  • Freewares
  • Tutorial
  • Windows 11
  • macOS
No Result
View All Result
Techniqued- Technoloy, Review and Tutorials
No Result
View All Result

How to Create a Full Backup of Windows 10

Nirmal by Nirmal
February 28, 2021
in Tutorial, Windows 10
1
Share on FacebookShare on Twitter

Backup is one of the most important aspects of our digital life. We never know when our smartphone or hard disk might get corrupted losing our precious photos or videos. It is always advisable to keep a backup of all your personal files at a different location so that in case there are any issues, you still have a separate copy available. The same holds good for Windows as well. In case there are any file corruption or malware infection, it is best to keep a system backup so that you can easily recover it. In this post, we will show in detail how to take a full backup of Windows 10.

Related Reading: Best backup and recovery tools for Windows 10.

How to Create a Full Backup of Windows 10

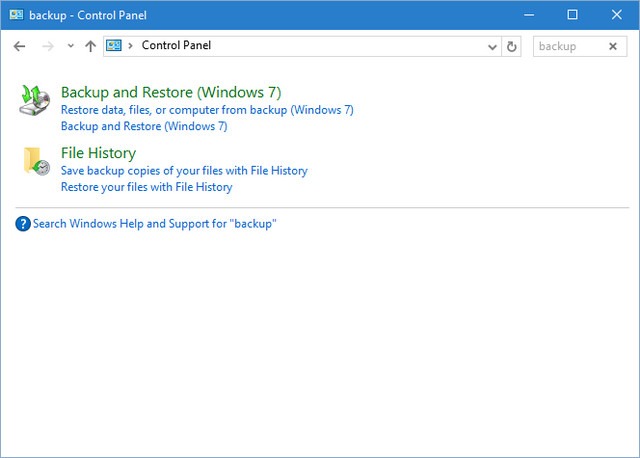
Step 1: The first step is to open the Control panel and type backup in the search bar. This shows you the option “Backup and Restore (Windows 7)”.
Full Backup of Windows 10

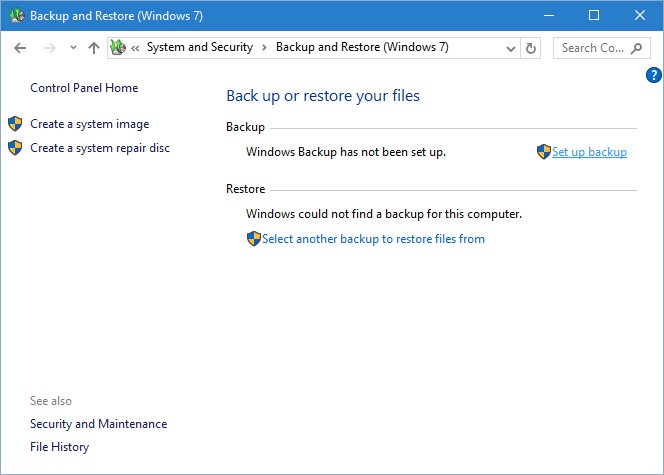
Step 2: Click on the backup and restore option. In the next step, click on the Set up backup link.
Full Backup of Windows 10

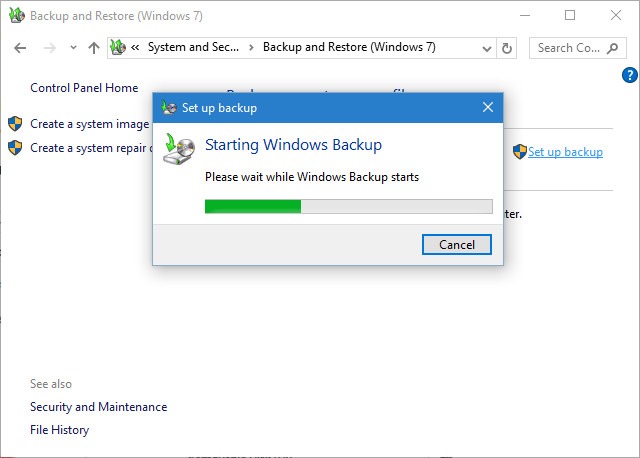
Step 3: This will start the backup tool.
Full Backup of Windows 10

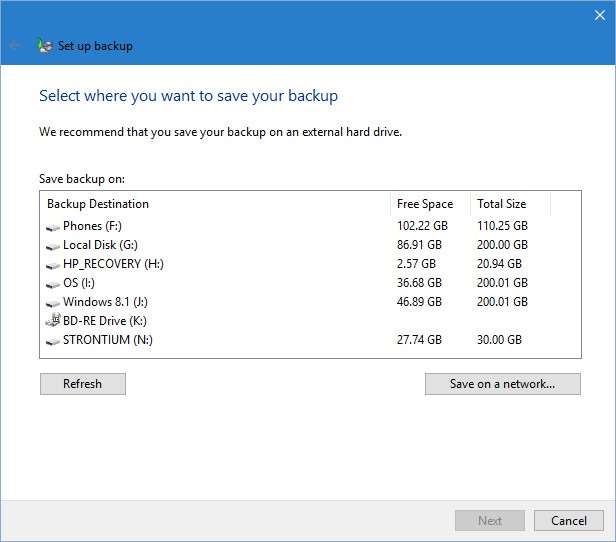
Step 4: In the next step, you need to select the destination where you want to save the backup. It is always good that you store the backup into an external drive and not in the default hard disk.
Full Backup of Windows 10

Step 5: Once you select the drive, click next. In the next process, you need to select the files to backup. You can either choose “Let Windows choose” or “Let me choose”.
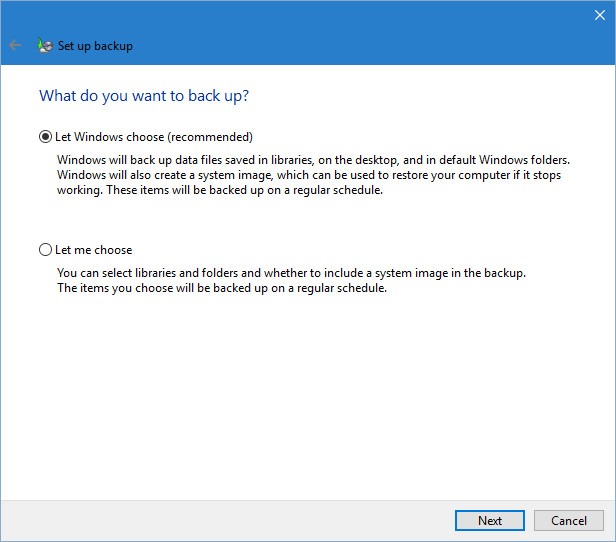
select files

Step 6: If you select to choose the files, in the next step, you can manually select the files and folders you want to have in the backup. You can also select all the drives.
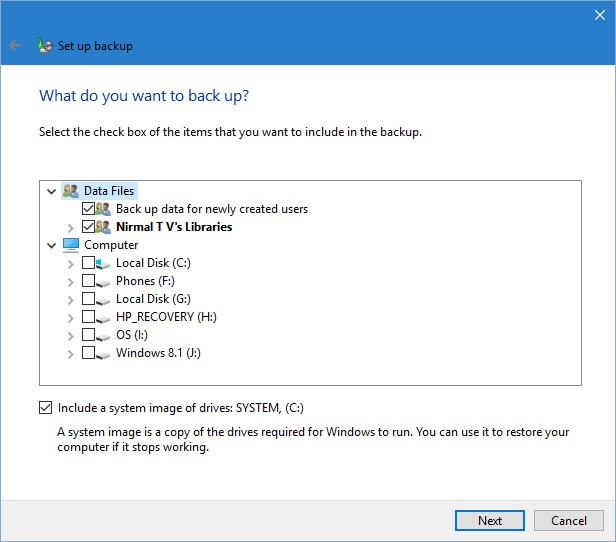
selecting files

Step 7: In the final step, Windows 10 confirms your settings and also provides an option to schedule a backup. Now click Save settings and run the backup.
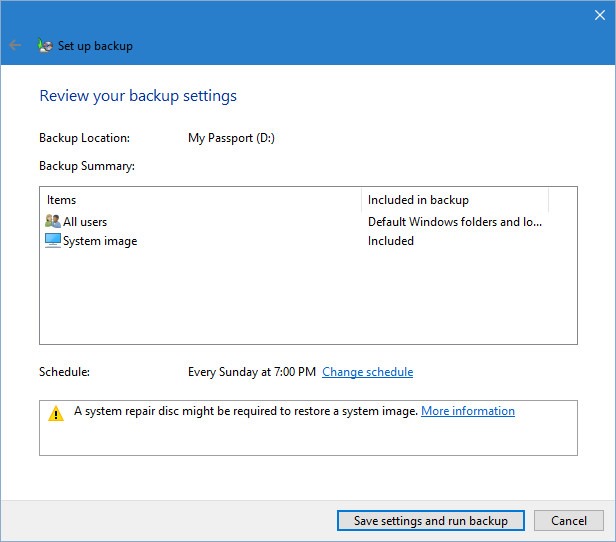
save backup

Windows will now run the backup tool and will start backing up files to the location you have selected. This process will run into several hours depending on the files you have selected.
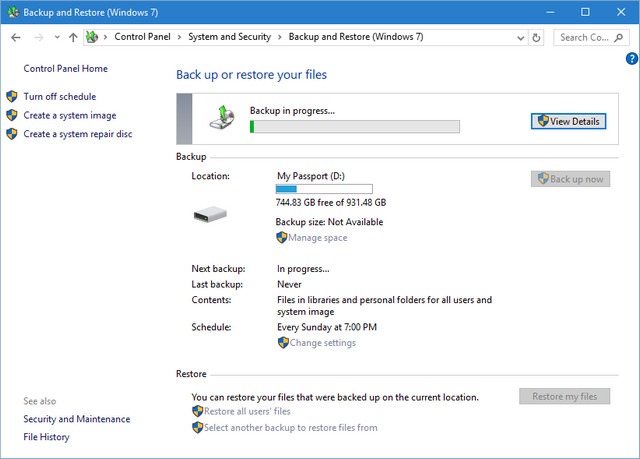
Backup in progress

Another option is to turn on file history. File history takes a backup of your personal files including libraries, desktop, contacts, and favorites. You can restore them any time when you want.
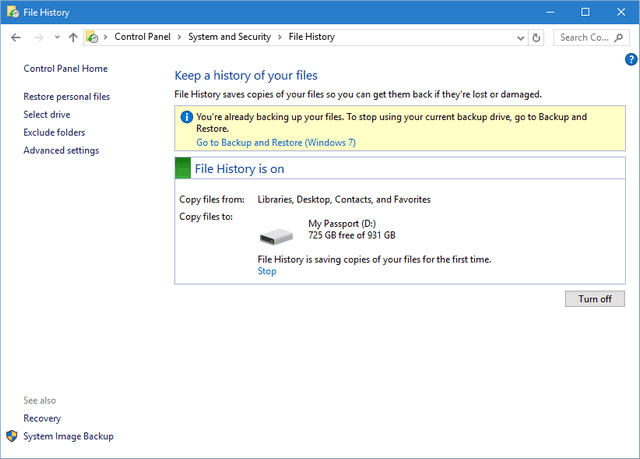
File history

Tags: BackupTutorialsWindows 10
ShareTweetSendSend
Previous Post

How to Convert Google Docs to Microsoft Word File

Next Post

How to make Microsoft Edge as Default Browser

Related Posts

Tutorial

How to Use Snapchat on PC

May 21, 2024
iOS

How to Delete YouTube Search and Watch History on iPhone

May 18, 2024
Social Networks

How to Change your Name on Facebook [2024]

May 12, 2024
Social Networks

How to Hide likes on Facebook [Tutorial]

May 10, 2024
Tutorial

How to Download All Photos from Google Photos

December 21, 2023
Tutorial

How to Open a .SWF File with SWF Player

November 23, 2023

Comments 1

  1. Nanci Mitchem   says:
    4 years ago

    Great news, For the most part I never comment on online diaries yet your article is convincing to the point that I never stop myself to say something in regards to it. You’re working viably, Keep it up. You can see this article, might be of help 🙂

    Reply

Leave a Reply Cancel reply

Your email address will not be published. Required fields are marked *

This site uses Akismet to reduce spam. Learn how your comment data is processed.


Latest Articles

How to Fix “Installation can’t continue” when trying to Update Nvidia Graphics Drivers

Download Windows 11 24H2 ISO (Offline Installer)

Can I Run Windows 11 without Activating

How to Use Snapchat on PC

How to Delete YouTube Search and Watch History on iPhone

How to Use Energy Saver on Windows 11

Techniqued- Technoloy, Review and Tutorials

© 2021 Techniqued - Technology, Tips, Tricks and Reviews

Navigate Site

  • About Us
  • Advertise with us
  • Contact Us
  • Copyright Policy
  • Disclaimer

Follow Us

No Result
View All Result
  • Android
  • Freewares
  • Tutorial
  • Windows 11
  • macOS

© 2021 Techniqued - Technology, Tips, Tricks and Reviews

This website uses cookies. By continuing to use this website you are giving consent to cookies being used. Visit our Privacy and Cookie Policy.