Techniqued- Technoloy, Review and Tutorials
  • Android
  • Freewares
  • Tutorial
  • Windows 11
  • macOS
No Result
View All Result
Techniqued- Technoloy, Review and Tutorials
  • Android
  • Freewares
  • Tutorial
  • Windows 11
  • macOS
No Result
View All Result
Techniqued- Technoloy, Review and Tutorials
No Result
View All Result

How to Partition an External Hard Disk in Windows 10

Nirmal by Nirmal
March 14, 2016
in Tutorial
0
Share on FacebookShare on Twitter

When you buy a new external hard disk, it will always have a single drive. But most of us have been used to multiple partitions on our laptop or desktop hard disk. We have already covered on how to partition the hard disk in Windows 10. When you want to organize your files into different categories, you might always want to partition hard disk and create multiple drives. To partition external hard disk drives, first you need to connect it to your PC.

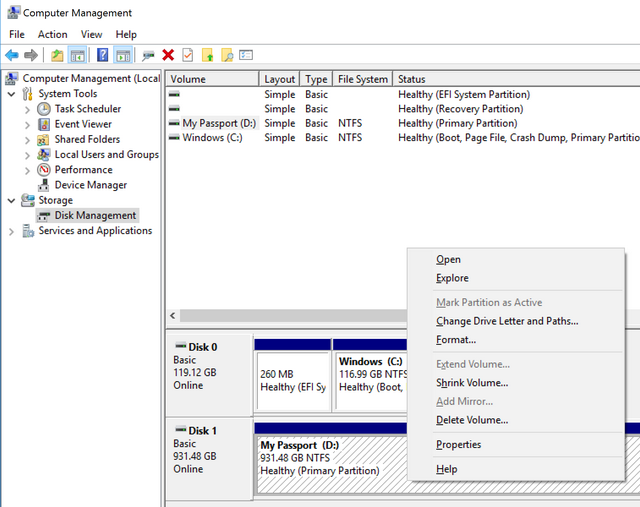
Windows 10 (or any other version) comes with a default option to manage hard disk where you can create, delete, extend, shrink and resize partitions. To start with the hard disk partitioning, you need to open the computer management section. To do this, you can either type the command compmgmt.msc in run command (Win key +R) and press enter or you can use the control panel to navigate (Control Panel-> All Control Panel items-> Administrative tools-> Computer Management).
Disk managerment


Here you will see both the internal and external hard disk drives. Now, right-click on the external drive and select Shrink Volume.
New volume

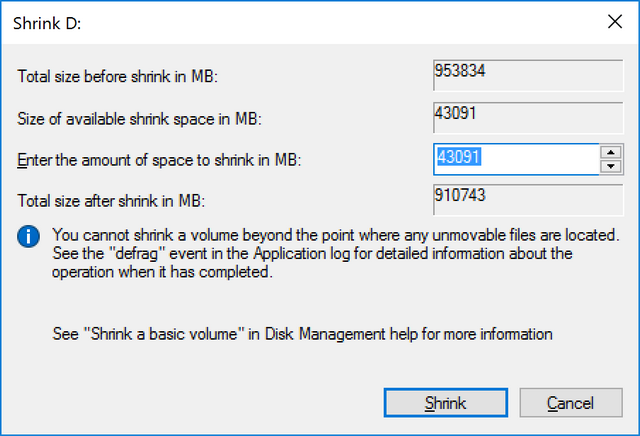
The tool will fetch the amount of volume that can be shrunk using the method. Now you can enter the partition size you want to make out of this. The amount of shrink volume depends on how the files are currently organized in your hard disk.
shrink volume

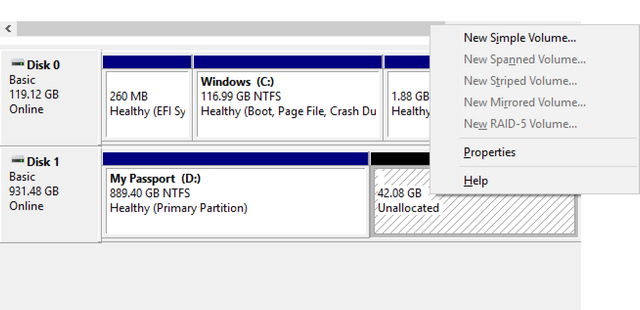
Now you need to click the Shrink button and follow the wizard. Finally, you need to select perform a quick format and also you can name the drive.
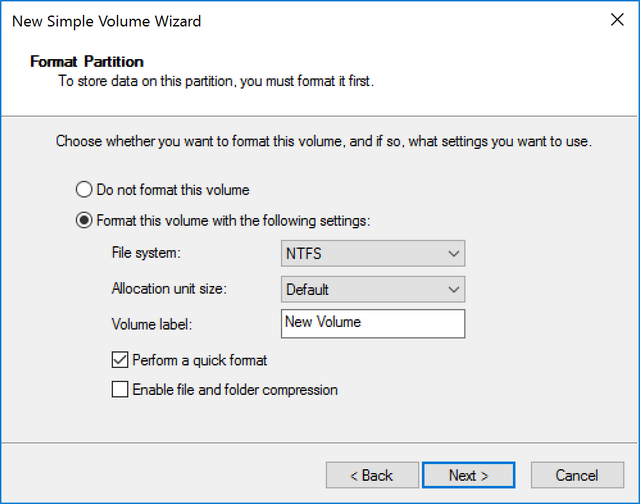
new volume creation

Once the creation is complete, you will see that a new drive has been added to your external hard disk with the space you allocated. You can delete this drive anytime and also merge with the existing drive to make it again a single partition.

To know more about extending, deleting and merging partitions, check this guide.

Tags: How toPartition Hard DiskTutorials
ShareTweetSendSend
Previous Post

Find the Fastest VPN Service near you with VPNify

Next Post

How to Disable Ads on Windows 10 Lock Screen

Related Posts

Tutorial

How to Open a .SWF File with SWF Player

November 23, 2023
Tutorial

5 Ways to Fix Unable to Rename Folders on Windows 11

October 17, 2023
Tutorial

How to Fix “Get an app to open this ‘ms-print-queue’ link” Error on Windows

October 1, 2023
Tutorial

How to Delete Drive Partition in Windows 11

September 9, 2023
Tutorial

How to Change Font Style in Gmail

September 8, 2023
Tutorial

How to Download Windows 11 Audio Drivers?

September 5, 2023

Leave a Reply Cancel reply

Your email address will not be published. Required fields are marked *

This site uses Akismet to reduce spam. Learn how your comment data is processed.


Latest Articles

How to find the Screen on Time on Windows 11 Laptop

7 Best Free Cleaner Tools for Windows 11

The Best File Manager App for Windows 11

How to Reset Network Settings on macOS

What Is an OGG File? How to Open it?

How to Enable Tablet Mode in Windows 11

Techniqued- Technoloy, Review and Tutorials

© 2021 Techniqued - Technology, Tips, Tricks and Reviews

Navigate Site

  • About Us
  • Advertise with us
  • Contact Us
  • Copyright Policy
  • Disclaimer

Follow Us

No Result
View All Result
  • Android
  • Freewares
  • Tutorial
  • Windows 11
  • macOS

© 2021 Techniqued - Technology, Tips, Tricks and Reviews

This website uses cookies. By continuing to use this website you are giving consent to cookies being used. Visit our Privacy and Cookie Policy.