Techniqued- Technoloy, Review and Tutorials
  • Android
  • Freewares
  • Tutorial
  • Windows 11
  • macOS
No Result
View All Result
Techniqued- Technoloy, Review and Tutorials
  • Android
  • Freewares
  • Tutorial
  • Windows 11
  • macOS
No Result
View All Result
Techniqued- Technoloy, Review and Tutorials
No Result
View All Result

How to Update to Android ICS 4.0.4 on Galaxy Nexus Easily

Nirmal by Nirmal
April 27, 2012
in Android
4
Share on FacebookShare on Twitter

Galaxy Nexus, the Google’s flagship phone running the Android ICS or Android 4.0, was released back in October 2011. We had reviewed the phone on this blog. The phone had received an update 4.0.2 some time back. Google had started rolling out the Android 4.0.4 versions to Galaxy Nexus and Nexus S users. Although there is no official details on the improvements and fixes in this update, users have noticed improvements in camera unit.

OTA updates were rolled out to some users of Nexus S and Galaxy Nexus, but majority of users are yet to receive this update. But at the same time you can download the update from Google and manually update it. Another way to easily get OTA updates is mentioned below. This step takes only 2 minutes of your time.

Please note that there is no guarantee that 100% you will get the update, but many users have got this update using the steps below. To get the OTA update, go to Settings-> Apps on your phone. Now select the All tab and scroll down to see the Google Services Framework.
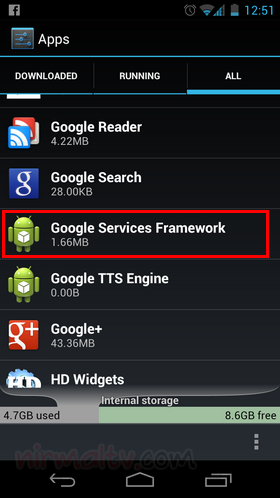
Apps

Click on this app and press the Force stop button. Once the app is stopped, click on the Clear data button below.
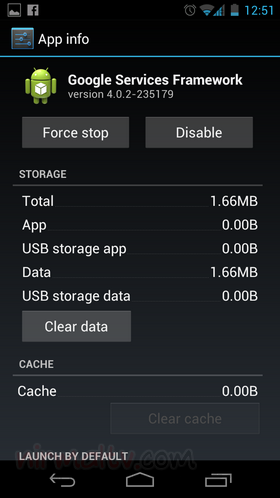
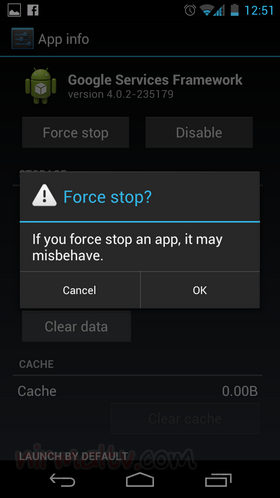
Force stop Warning

Now go to Settings-> About Phone-> System updates. You will see that new updates are available for you. Download and install the updates, your phone will reboot when it installs the update.
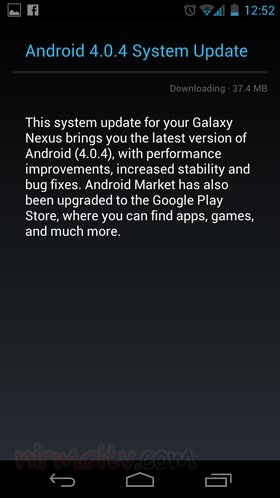
ICS update

This trick might not work on all Galaxy Nexus as there are variants updated by Samsung and few others updated by Google.

Tags: 4.0.4AndroidGalaxy NexusICSTipsTricksTutorialsUpdate Galaxy Nexus
ShareTweetSendSend
Previous Post

How to Disable or Turn off PIN and Picture Password Logon in Windows 8

Next Post

Remove Traces of USB Drives from Registry using USBOblivion

Related Posts

Android

How to Restrict Apps from Using Mobile Data on Android

March 22, 2023
Android

How to Fix “Your Device Isn’t Compatible with This Version” on Android

March 18, 2023
Android

How to Check Your Data Usage on Android and iPhone

March 16, 2023
Android

How to Enable Reading Mode on Android

March 14, 2023
Android

7 Best Android Emulators for Windows 11

January 14, 2023
Android

How to Create Locked Folder in Google Photos

December 21, 2022

Comments 4

  1. billy says:
    11 years ago

    couldn’t get it to work on verizon GN

    Reply
    • Nirmal says:
      11 years ago

      As i mentioned in the article, there are two versions, one updated by Google and one by Samsung. It seems the Samsung updated ones does not work using this step.

      Reply
  2. Chetan says:
    11 years ago

    thanks i will try the upgrade today!!:)

    Reply

Leave a Reply Cancel reply

Your email address will not be published. Required fields are marked *

This site uses Akismet to reduce spam. Learn how your comment data is processed.


Latest Articles

How to Fix “Virus scan failed” Error in Google Chrome

How to Fix “The Application Was Unable to Start Correctly (0xc0000142)” Error in Windows

How to Compose Emails with ChatGPT in Gmail

How to Add Voice Message to WhatsApp Status

How to Fix Windows Update Error 0x800f080a

5 Ways to Open Device Manager in Windows 11

Techniqued- Technoloy, Review and Tutorials

© 2021 Techniqued - Technology, Tips, Tricks and Reviews

Navigate Site

  • About Us
  • Advertise with us
  • Contact Us
  • Copyright Policy
  • Disclaimer

Follow Us

No Result
View All Result
  • Android
  • Freewares
  • Tutorial
  • Windows 11
  • macOS

© 2021 Techniqued - Technology, Tips, Tricks and Reviews

This website uses cookies. By continuing to use this website you are giving consent to cookies being used. Visit our Privacy and Cookie Policy.