Techniqued- Technoloy, Review and Tutorials
  • Android
  • Freewares
  • Tutorial
  • Windows 11
  • macOS
No Result
View All Result
Techniqued- Technoloy, Review and Tutorials
  • Android
  • Freewares
  • Tutorial
  • Windows 11
  • macOS
No Result
View All Result
Techniqued- Technoloy, Review and Tutorials
No Result
View All Result

How to Install Custom Themes on Windows 7 and Vista

Nirmal by Nirmal
March 1, 2011
in Windows 7
1
Share on FacebookShare on Twitter

As everyone knows, Windows 7 does not support installing third party or custom themes directly which tweaks the Windows Explorer, taskbar and other stuff. In case you want to apply third party tools, then you need to patch your system with tools like UxTheme or Universal Theme Patcher. So how do you go about patching files and installing new themes? Follow these simple steps you can install third party themes on your Windows 7 and Vista.

Windows 7

We are going to use Universal theme patcher for this tutorial. Download the latest version of Universal theme patcher and then extract the files. There will be 2 files one for 32 bit Windows and one for 64 bit. Based on your system, open the required file (in administrator mode). The application will let you know how many files needs to be patched.
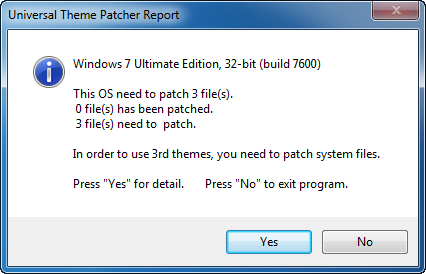
Patch files

Click on yes and then the application shows up the list of files to be patched.
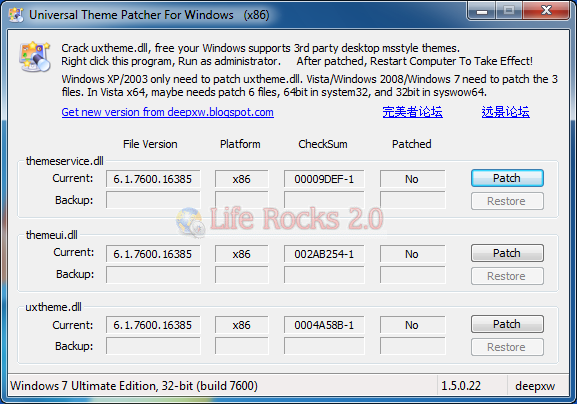
Patch Files required

Click on Patch button corresponding to the files and it will inform you about the patching details. There is also option to restore it in case you want to revert back to old file.

Once the patching is complete, restart your PC for the changes to take effect. Once you have restarted the PC, you can now apply third party themes which have custom explorer, taskbar, icons etc. To easily apply third party themes, you can download the Windows Themes Installer, which can easily apply the third party themes on your patched Windows.

Related: Download Windows 7 Themes

Download Windows theme installer and run the portable application.
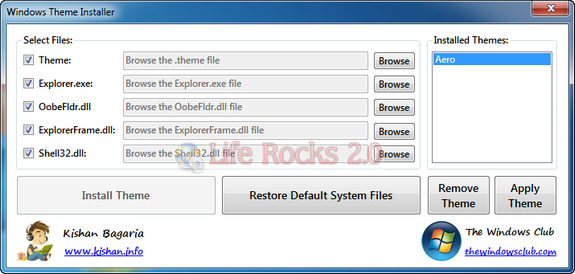
Windows Theme Installer

Check the boxes against which the third party theme has a custom file. Browse for the theme files and then click install theme. You can always restore the default system files from the application.


Tags: How toInstall Custom Themes in Windows 7Install Third Party ThemesPatch Windows 7 ExplorerWindows 7 Custom ThemesWindows 7 Themes
ShareTweetSendSend
Previous Post

Bookmark Manager for Google Chrome

Next Post

Creates Playlists Quickly and Easily with Playlist Creator

Related Posts

Windows 10

Where can I Download Windows Legally

April 15, 2020
Windows 7

How to Download Windows 7 ISO [Tutorial]

April 2, 2020
Windows 7

Difference between Sleep, Hibernate, and Hybrid Sleep in Windows 10?

November 19, 2019
Windows 10

How to Fix USB Device Not Recognized on Windows 10

November 11, 2019
Windows 10

Winaero Tweaker – Universal Tweaker Software for Windows

March 11, 2015
Windows 7

How to get Windows 10 Style Folder icons in Windows 8 and Windows 7

December 30, 2014

Comments 1

  1. Fernando Romero says:
    12 years ago

    I dont see themes here where they?.?dont make this complicated?

    Reply

Leave a Reply Cancel reply

Your email address will not be published. Required fields are marked *

This site uses Akismet to reduce spam. Learn how your comment data is processed.


Latest Articles

How to Fix “Installation can’t continue” when trying to Update Nvidia Graphics Drivers

Download Windows 11 24H2 ISO (Offline Installer)

Can I Run Windows 11 without Activating

How to Use Snapchat on PC

How to Delete YouTube Search and Watch History on iPhone

How to Use Energy Saver on Windows 11

Techniqued- Technoloy, Review and Tutorials

© 2021 Techniqued - Technology, Tips, Tricks and Reviews

Navigate Site

  • About Us
  • Advertise with us
  • Contact Us
  • Copyright Policy
  • Disclaimer

Follow Us

No Result
View All Result
  • Android
  • Freewares
  • Tutorial
  • Windows 11
  • macOS

© 2021 Techniqued - Technology, Tips, Tricks and Reviews

This website uses cookies. By continuing to use this website you are giving consent to cookies being used. Visit our Privacy and Cookie Policy.