Techniqued- Technoloy, Review and Tutorials
  • Android
  • Freewares
  • Tutorial
  • Windows 11
  • macOS
No Result
View All Result
Techniqued- Technoloy, Review and Tutorials
  • Android
  • Freewares
  • Tutorial
  • Windows 11
  • macOS
No Result
View All Result
Techniqued- Technoloy, Review and Tutorials
No Result
View All Result

How to Fix “Disk not Ejected Properly” Error on macOS

Nirmal by Nirmal
June 7, 2023
in macOS
0
Share on FacebookShare on Twitter

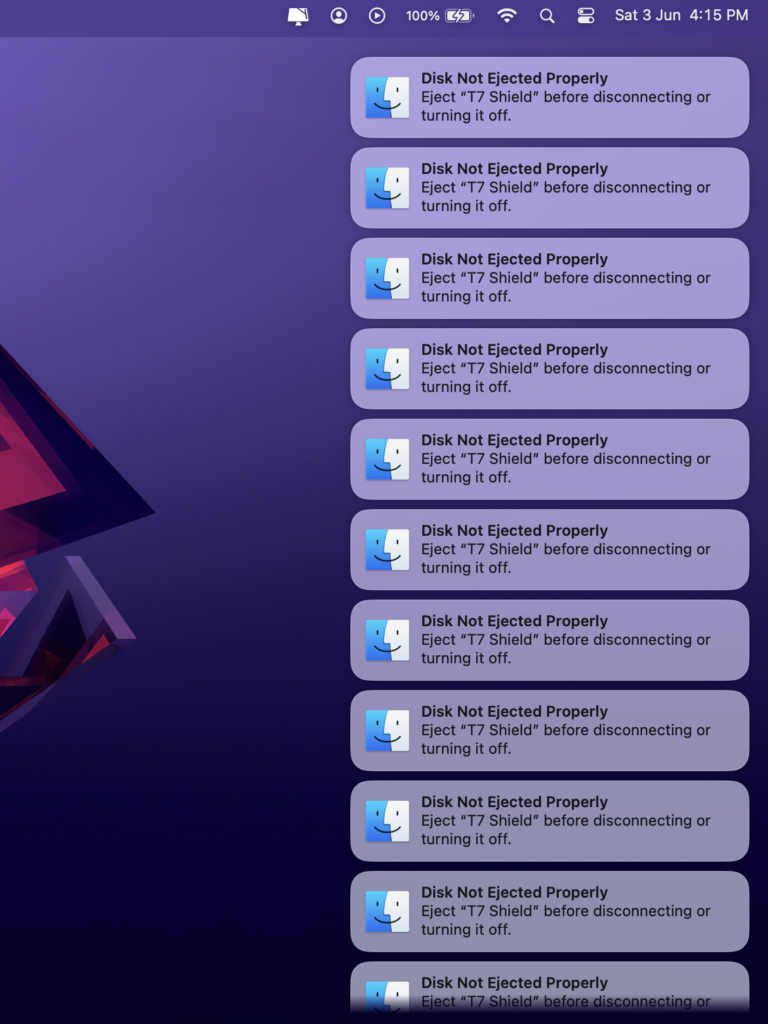
macOS Ventura is the latest version of macOS and comes with improvements over the previous version. We have covered a lot of articles, tips, and tricks on macOS Ventura. But one of the issues faced by many users while using external hard disks on macOS is the error that says “Disk not ejected properly”. This error happens if you have put the macOS laptop to sleep and when you wake up the device, you get 100s of such notifications. These notifications can be annoying as there is no way to clear all of them together and you have to clear them one by one. So how to fix the “Disk not ejected properly” error on macOS?

Fix “Disk not Ejected Properly” Error on macOS

How to Fix “Disk not Ejected Properly” Error on macOS:

There are different ways to fix this issue as it could be the result of multiple aspects on your macOS.

Method 1: 

The first method is to check the cables for your external disk which is connected to the macOS. In case it is not proper or if there is any cable issue, this error can come frequently. If the hard drive cable is faulty or a damaged USB port on your Macbook, then this error can occur. If there is a problem with either of these two, then your hard drive will disconnect, showing the error message.

Method 2: 

If the issue is not from the faulty cable or ports, then you can change the energy saver settings on the Macbook and there are many users who have been able to fix the error using this method. Follow the steps below to fix this issue.

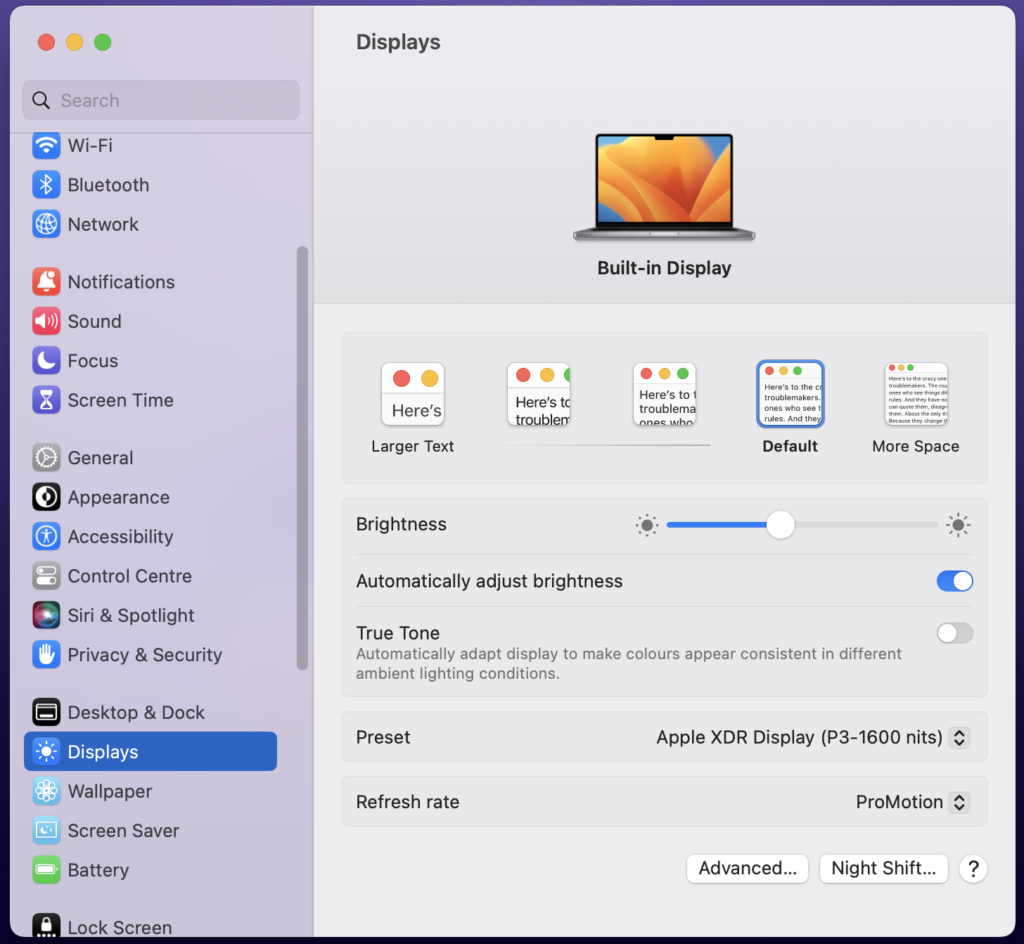
Step 1: Open the Settings app on your macOS.

Step 2: Navigate to Display settings at the bottom.

Step 3: Under the Display settings, you will see an option Advanced, select this option.

Fix “Disk not Ejected Properly” Error on macOS

Step 4: Under the advanced setting, at the bottom, you will be able to see the option “Prevent automatic sleeping on power adaptor when the display is off”

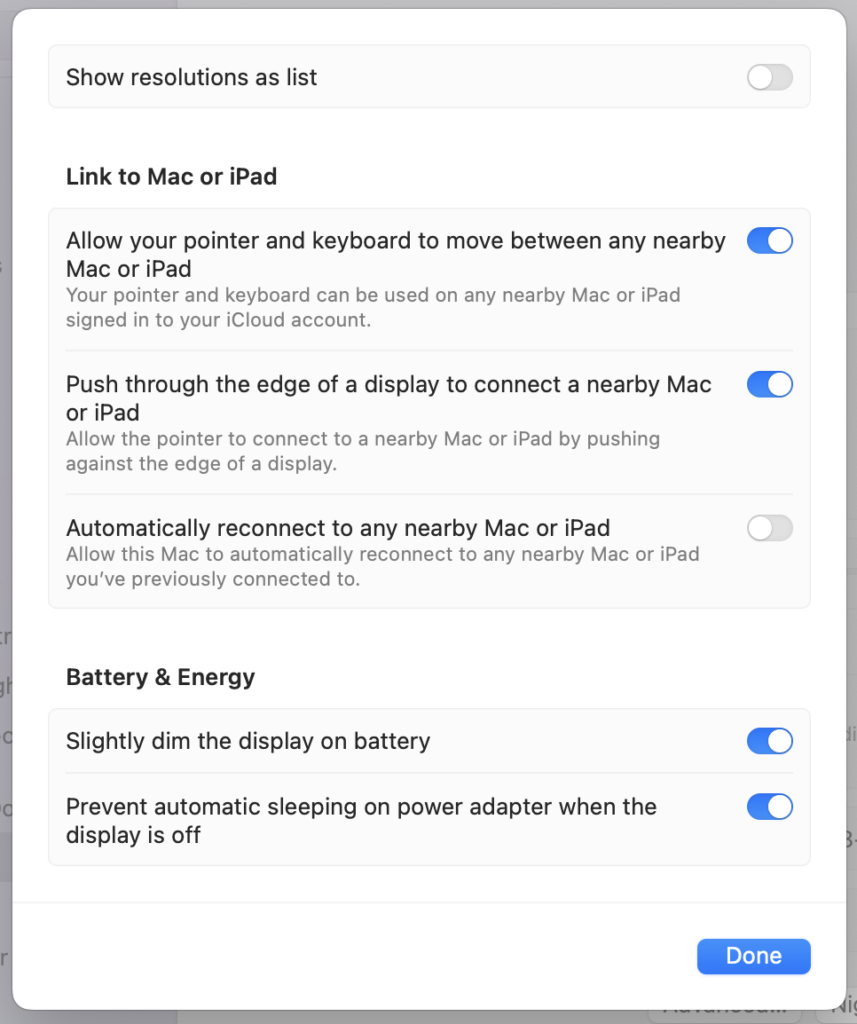
Step 5: You need to enable this option. This will prevent the sleeping of your PC and hard disk when the monitor is off and this should be able to fix your issue.

Tags: How tomacOS
ShareTweetSendSend
Previous Post

6 Best AI Tools for Better Meetings

Next Post

What is Smart App Control and Why is it Disabled on Windows?

Related Posts

macOS

How to Reset Network Settings on macOS

November 25, 2023
macOS

3 Easy Ways to Switch User Accounts in macOS Sonoma

October 27, 2023
macOS

How to Enable Game Mode on macOS Sonoma

October 16, 2023
macOS

How to Customize the New Login Screen on macOS Sonoma

October 15, 2023
macOS

How to Add Widgets to macOS Sonoma

October 11, 2023
Apple iPhone

Universal Clipboard Not Working Between iPhone and MacOS- How to Fix

October 3, 2023

Leave a Reply Cancel reply

Your email address will not be published. Required fields are marked *

This site uses Akismet to reduce spam. Learn how your comment data is processed.


Latest Articles

How to Fix “Installation can’t continue” when trying to Update Nvidia Graphics Drivers

Download Windows 11 24H2 ISO (Offline Installer)

Can I Run Windows 11 without Activating

How to Use Snapchat on PC

How to Delete YouTube Search and Watch History on iPhone

How to Use Energy Saver on Windows 11

Techniqued- Technoloy, Review and Tutorials

© 2021 Techniqued - Technology, Tips, Tricks and Reviews

Navigate Site

  • About Us
  • Advertise with us
  • Contact Us
  • Copyright Policy
  • Disclaimer

Follow Us

No Result
View All Result
  • Android
  • Freewares
  • Tutorial
  • Windows 11
  • macOS

© 2021 Techniqued - Technology, Tips, Tricks and Reviews

This website uses cookies. By continuing to use this website you are giving consent to cookies being used. Visit our Privacy and Cookie Policy.