Techniqued- Technoloy, Review and Tutorials
  • Android
  • Freewares
  • Tutorial
  • Windows 11
  • macOS
No Result
View All Result
Techniqued- Technoloy, Review and Tutorials
  • Android
  • Freewares
  • Tutorial
  • Windows 11
  • macOS
No Result
View All Result
Techniqued- Technoloy, Review and Tutorials
No Result
View All Result

How to Disable Automatic Backup and Sync of Google Photos

Nirmal by Nirmal
November 29, 2022
in Tips and Tricks
1
Share on FacebookShare on Twitter

Google Photos is one of the popular online tools from Google where you can store your photos and memories. Google photos allow users to upload photos in their original size or you can upload in a reduced size to save space. You also get a limited amount of free space to store your photos online. Google photos also have AI-based suggestions and tools which give you options to make more memories out of your photos. If you are using an Android phone, you might already know that you have the option to automatically upload photos from your phone to Google Photos. So whenever you take a new photo, Google Photos uploads the image to your account online. But how to disable automatic backup and sync of Google photos?

Related Reading: How to Sync iCloud contacts with Google

disable Automatic Backup and Sync of Google Photos

How to Disable Automatic Backup and Sync of Google Photos:

If you do not want your photos to be automatically uploaded to Google, you can disable the option in the Google photos app, here is how to do it.

Step 1: Open the Google photos app on your phone.

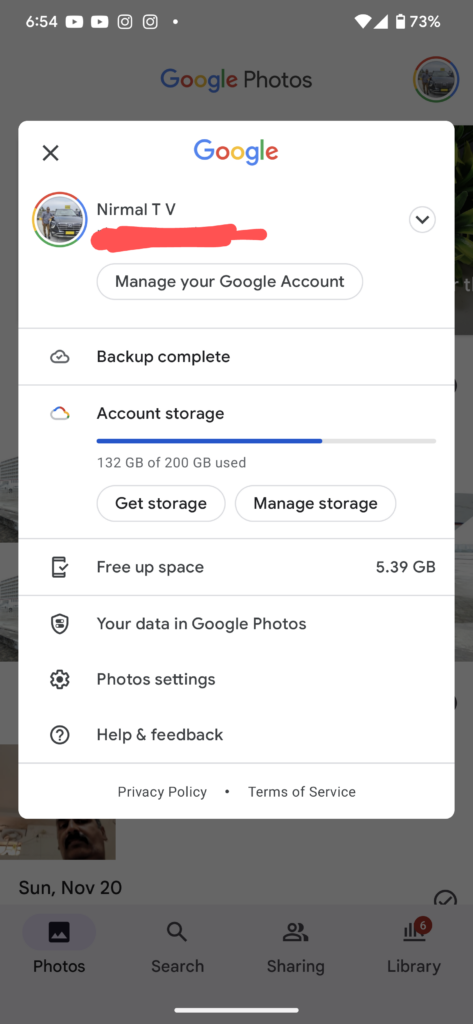
Step 2: Click on the profile picture in the top right corner of the app. Now you can see a menu, click the Photo settings option in the list.

disable Automatic Backup and Sync of Google Photos

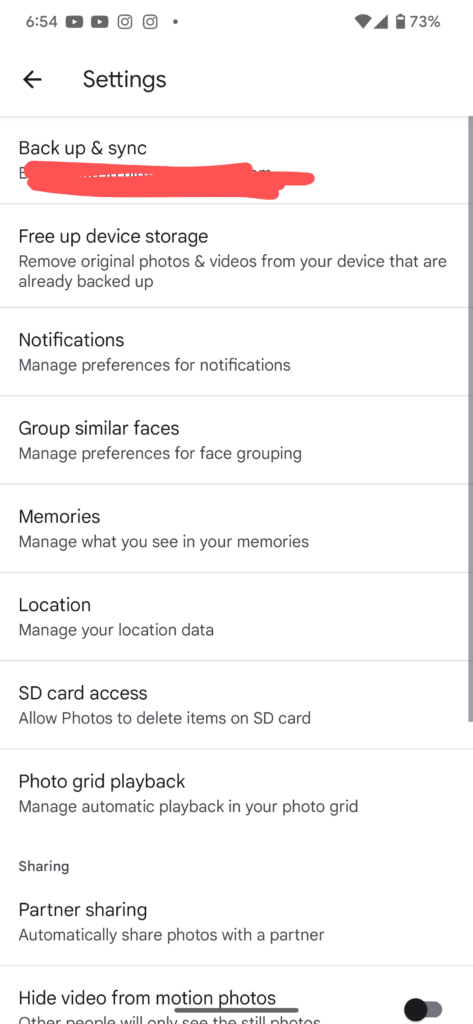
Step 3: This will take you to the settings for your Google Photos account. Here you will be able to see the Backup & sync options listed.

disable Automatic Backup and Sync of Google Photos

Step 4: Select this option and you can see a slider to disable the backup & sync option. Once you disable this, your photos will not be automatically backed up to Google Photos.

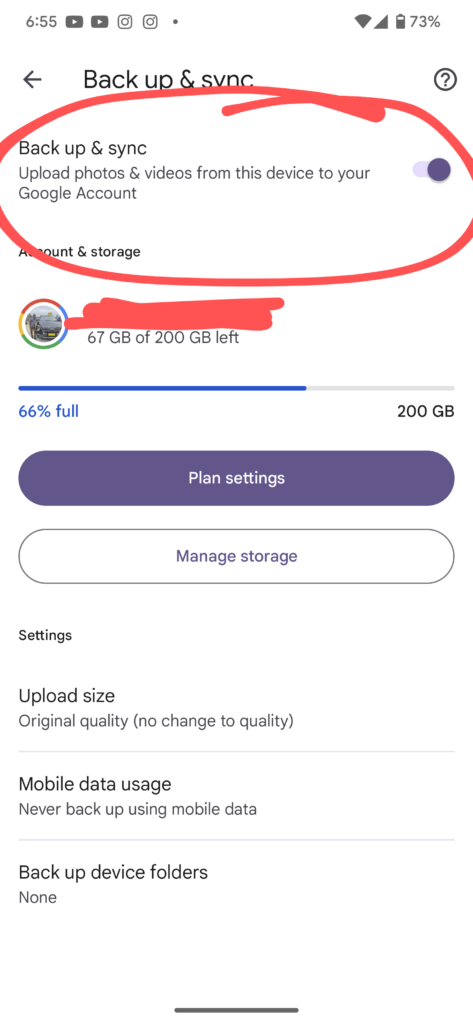
All your existing photos will remain intact and will not be deleted, only the new photos will stay on your phone and will not be uploaded to Google Photos. This is useful if you are on a limited data plan or limited storage plan on Google photos.

Tags: Google PhotosHow to
ShareTweetSendSend
Previous Post

How to Remove Junk Files From Windows 11

Next Post

How to Enable Dark Theme on Instagram on Windows

Related Posts

Tips and Tricks

Can I Run Windows 11 without Activating

June 14, 2024
Social Networks

How to Change your Instagram Name

May 12, 2024
Social Networks

How To View Your Instagram Reels Watch History

May 11, 2024
Social Networks

How To Post Longer Videos On Instagram

May 6, 2024
Social Networks

How to Find Who Unfollowed you on Instagram

December 9, 2023
Social Networks

How to Download Instagram Reels [Official Method]

November 28, 2023

Comments 1

  1. drift boss says:
    3 years ago

    Here’s how to turn off the automatic upload feature in the Google Photographs app if you don’t want your photos to be sent to Google.

    Reply

Leave a Reply Cancel reply

Your email address will not be published. Required fields are marked *

This site uses Akismet to reduce spam. Learn how your comment data is processed.


Latest Articles

How to Fix “Installation can’t continue” when trying to Update Nvidia Graphics Drivers

Download Windows 11 24H2 ISO (Offline Installer)

Can I Run Windows 11 without Activating

How to Use Snapchat on PC

How to Delete YouTube Search and Watch History on iPhone

How to Use Energy Saver on Windows 11

Techniqued- Technoloy, Review and Tutorials

© 2021 Techniqued - Technology, Tips, Tricks and Reviews

Navigate Site

  • About Us
  • Advertise with us
  • Contact Us
  • Copyright Policy
  • Disclaimer

Follow Us

No Result
View All Result
  • Android
  • Freewares
  • Tutorial
  • Windows 11
  • macOS

© 2021 Techniqued - Technology, Tips, Tricks and Reviews

This website uses cookies. By continuing to use this website you are giving consent to cookies being used. Visit our Privacy and Cookie Policy.