Techniqued- Technoloy, Review and Tutorials
  • Android
  • Freewares
  • Tutorial
  • Windows 11
  • macOS
No Result
View All Result
Techniqued- Technoloy, Review and Tutorials
  • Android
  • Freewares
  • Tutorial
  • Windows 11
  • macOS
No Result
View All Result
Techniqued- Technoloy, Review and Tutorials
No Result
View All Result

How to Enable or Disable Snap Layouts in Windows 11

Nirmal by Nirmal
July 5, 2021
in Windows 11
0
Share on FacebookShare on Twitter

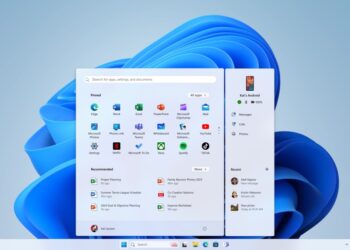
Microsoft has announced the latest version of their Windows OS, the Windows 11. Windows 11 comes with new features, UI improvements, and also performance improvements. Windows 11 comes with a major overhaul in terms of UI, right from the start menu to taskbar, settings panel, file manager, context menu, and more. One of the changes to Windows 10 is the way snap window works. Snap has been there in Windows 10 as well, but it has been changed to different layout option. So how to enable or disable snap layouts in Windows 11? Let’s find out.

Enable or Disable Snap Layouts in Windows 11

Enable or Disable Snap Layouts in Windows 11

Step 1: The first step is to open the settings and then select System. Under the system, select multitasking option.

Step 2: Here you can enable or disable snap windows option using the slider option.

Enable or Disable Snap Layouts in Windows 11

Step 3: If you expand the option, you can see additional options for snap windows. You can enable or disable these individually based on how you want the snap to work.

Snap options

These additional options are

  • When I snap a window, show what I can snap next to it
  • Show snap layouts when I hover over a window’s maximize button
  • Show snap layouts that the app is part of when I hover over the taskbar buttons
  • When I drag a window, let me snap it without dragging all the way to the screen edge
  • When I snap a window, automatically size it to fill the available space
  • When I resize a snapped window, simultaneously resize any adjacent snapped window

Snap windows is one of the new features included and works perfectly well on Windows 11. If you are still not using it, we suggest you to try this feature.

Tags: How toWindows 11
Previous Post

Check if your PC is ready to Install Windows 11

Next Post

How to Disable Meet Now in Taskbar in Windows 10

Related Posts

Tutorial

How to Enable Focus Mode in Windows 11

February 22, 2022
Windows 11

What is Reserved Storage in Windows 11

February 6, 2022
Tutorial

How to Reset Windows 11 without Losing Files

February 5, 2022
Tutorial

How to Disable Firewall in Windows 11

February 3, 2022
Tutorial

How to Repair Apps in Windows 11

February 2, 2022
Tips and Tricks

5 Ways to Open Task Manager in Windows 11

February 1, 2022

Leave a Reply Cancel reply

Your email address will not be published. Required fields are marked *

This site uses Akismet to reduce spam. Learn how your comment data is processed.


Latest Articles

Tutorial

How to Enable Focus Mode in Windows 11

February 22, 2022
Reviews

Movavi Video Converter- a Versatile Video Converter with support for 180+ Formats

February 16, 2022
Windows 11

What is Reserved Storage in Windows 11

February 6, 2022
Tutorial

How to Reset Windows 11 without Losing Files

February 5, 2022
Techniqued- Technoloy, Review and Tutorials

© 2021 Techniqued - Technology, Tips, Tricks and Reviews

Navigate Site

  • About Us
  • Advertise with us
  • Contact Us
  • Copyright Policy
  • Disclaimer

Follow Us

No Result
View All Result
  • Android
  • Freewares
  • Tutorial
  • Windows 11
  • macOS

© 2021 Techniqued - Technology, Tips, Tricks and Reviews