Techniqued- Technoloy, Review and Tutorials
  • Android
  • Freewares
  • Tutorial
  • Windows 11
  • macOS
No Result
View All Result
Techniqued- Technoloy, Review and Tutorials
  • Android
  • Freewares
  • Tutorial
  • Windows 11
  • macOS
No Result
View All Result
Techniqued- Technoloy, Review and Tutorials
No Result
View All Result

How to Enable Split Screen View on macOS

Nirmal by Nirmal
February 4, 2021
in macOS, Tips and Tricks
0
Share on FacebookShare on Twitter

When you are working on multiple apps or multiple windows on macOS, then often it becomes painful to shift from one window to another. This is where split-screen or split view mode comes into the picture. Windows 10 has by default this option wherein you can open apps side by side. This feature is available in macOS as well and in this post, we will show you how to enable split screen view on macOS.

Related Reading: How to Automatically Hide the Dock on macOS

Split view on macOS is a feature where you can have two apps side by side without overlapping one another. For example, if you are typing from a document to another place, it will be easy for you to look into the document and at the same time type on the other window. So how to enable it?

Step 1: First, you need to make sure both the apps, which you want to use side by side are open and running in the background on your macOS

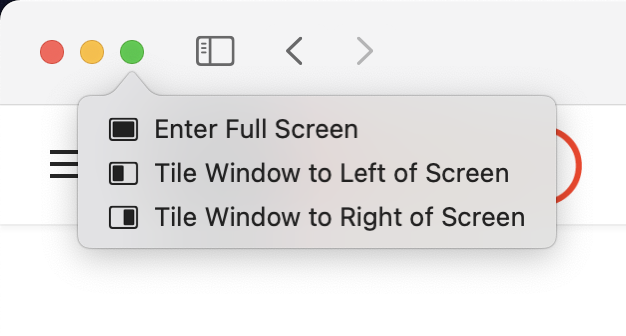
Step 2: Now move the cursor on the top-left corner of the app which you want to make split screen and you’ll see three buttons of different colors. Move the cursor and place it over the green button.

Step 3: Here you will see an option “Tile Window to left of screen”, select and your existing window will be tiled to the left side.

Enable Split Screen View on macOS

Step 4: On the right side, you will be able to select the second window from the list of all apps running. Now select the app you want to have on the right side.

Enable Split Screen View on macOS

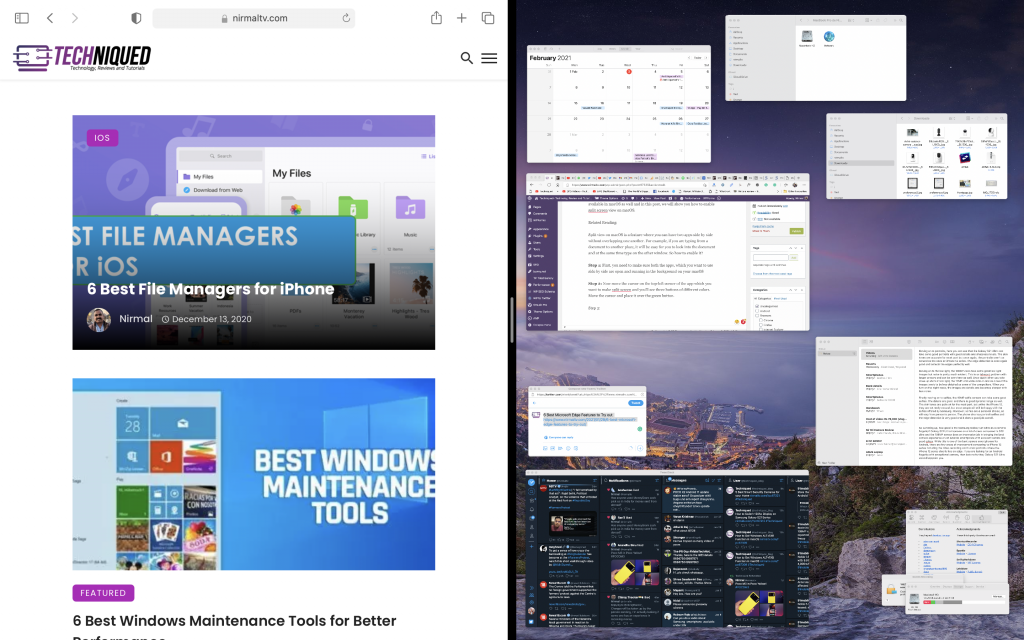
Step 5: Now you can see two apps or windows running side by side.

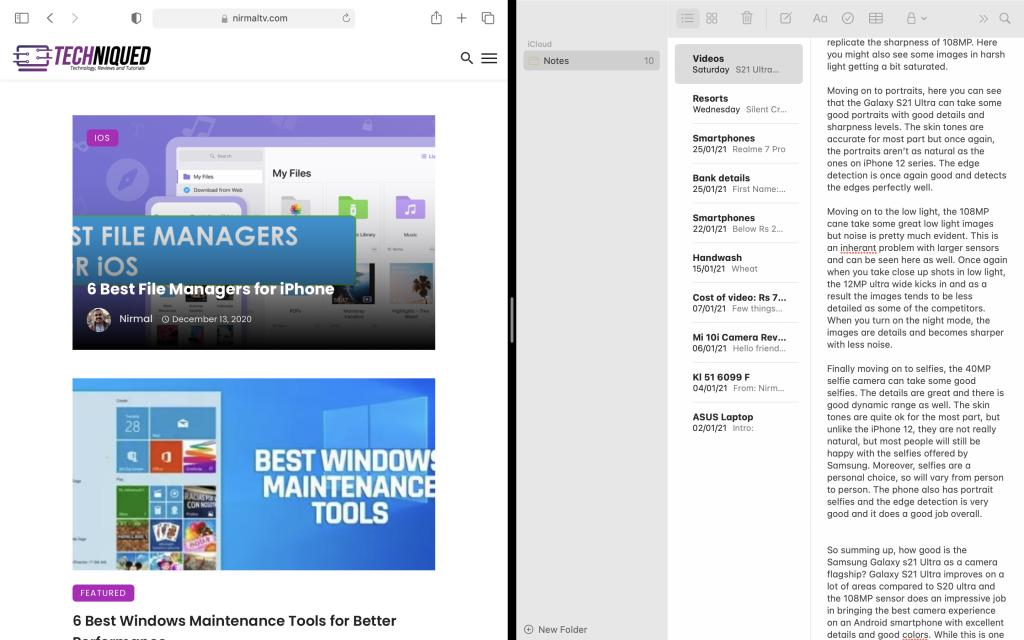
Step 6:  You can also resize and adjust the window size using the control at the center, you can drag it to resize the split-screen view.


Tags: macOSTipsTricks
Previous Post

5 Best Smart Security Cameras for your Home

Next Post

How to Check CPU Temp and Fan Speeds on macOS

Related Posts

Tips and Tricks

5 Ways to Open Task Manager in Windows 11

February 1, 2022
Freewares

How to Check if Mac Performance is Throttled due to Heating Issues

December 15, 2021
Chrome

How to Enable Windows 11 Style Menus on Google Chrome

November 22, 2021
Chrome

How to Enable HTTPS Only Mode in Chrome

November 22, 2021
macOS

How to Diagnose and Fix Battery Issues on Mac

November 20, 2021
Freewares

How to Hide the Notch on Macbook Pro

November 19, 2021

Leave a Reply Cancel reply

Your email address will not be published. Required fields are marked *

This site uses Akismet to reduce spam. Learn how your comment data is processed.


Latest Articles

Tutorial

How to Enable Focus Mode in Windows 11

February 22, 2022
Reviews

Movavi Video Converter- a Versatile Video Converter with support for 180+ Formats

February 16, 2022
Windows 11

What is Reserved Storage in Windows 11

February 6, 2022
Tutorial

How to Reset Windows 11 without Losing Files

February 5, 2022
Techniqued- Technoloy, Review and Tutorials

© 2021 Techniqued - Technology, Tips, Tricks and Reviews

Navigate Site

  • About Us
  • Advertise with us
  • Contact Us
  • Copyright Policy
  • Disclaimer

Follow Us

No Result
View All Result
  • Android
  • Freewares
  • Tutorial
  • Windows 11
  • macOS

© 2021 Techniqued - Technology, Tips, Tricks and Reviews