Techniqued- Technoloy, Review and Tutorials
  • Android
  • Freewares
  • Tutorial
  • Windows 11
  • macOS
No Result
View All Result
Techniqued- Technoloy, Review and Tutorials
  • Android
  • Freewares
  • Tutorial
  • Windows 11
  • macOS
No Result
View All Result
Techniqued- Technoloy, Review and Tutorials
No Result
View All Result

[How To] Embed Google Photo Sphere in any Website

Nirmal by Nirmal
November 11, 2019
in Google, Tutorial
0
Share on FacebookShare on Twitter

Photo Sphere is a feature which was announced by Google with the release of Android Jelly Bean. With Photo Sphere, you can snap pictures in every direction that come together into incredible, immersive photo spheres that put you right inside the scene. Initially you could view your photo spheres right on your phone or share them on Google+ with your friends and family, or even add them to Google Maps for the world to see.

But today Google has announced that you can now embed these images to any website. This means you can view photo sphere images without having to use Google+.
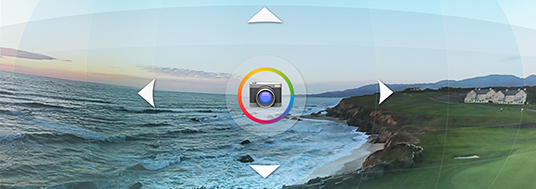
Photosphere

How to Embed them into any web page:

The instructions to embed the Photo Spheres to web pages is pretty simple. You need to add the following Javascript to your web page.

<script type="text/javascript" src="https://apis.google.com/js/plusone.js"></script>

To add the photo sphere viewer to your website, use the g:panoembed element. The following is an example:

<g:panoembed imageurl="https://lh5.googleusercontent.com/-kr97Eucg6sM/UKGEuvo_eBI/AAAAAAAAi0s/adq8uqyhm_k/photo.jpg"
             fullsize="4096,2048"
             croppedsize="4096,1380"
             offset="0,480"
             displaysize="600,400"/>

The Google+ Platform API will convert all the g:panoembed elements on the page into the interactive photo sphere viewer when this JavaScript function is executed. You just need to change the image URL although there are other parameters available.

Example

This simple example will show the photo sphere viewer in action. You can view the page’s source code to see how it was created. Once the image is loaded, you can use the mouse to get the complete view.

More details on this available here. This is really a nice move by Google to promote Photo Sphere and also useful web owners to display images in better way.

Tags: GoogleHow toPhoto SphereTutorials
ShareTweetSendSend
Previous Post

Acer Aspire P3- Ultrabook Convertible

Next Post

Acer Releases new Android Tablet Iconia A1

Related Posts

Tutorial

How to Use Snapchat on PC

May 21, 2024
iOS

How to Delete YouTube Search and Watch History on iPhone

May 18, 2024
Social Networks

How to Change your Name on Facebook [2024]

May 12, 2024
Social Networks

How to Hide likes on Facebook [Tutorial]

May 10, 2024
Tutorial

How to Download All Photos from Google Photos

December 21, 2023
Tutorial

How to Open a .SWF File with SWF Player

November 23, 2023

Leave a Reply Cancel reply

Your email address will not be published. Required fields are marked *

This site uses Akismet to reduce spam. Learn how your comment data is processed.


Latest Articles

How to Fix “Installation can’t continue” when trying to Update Nvidia Graphics Drivers

Download Windows 11 24H2 ISO (Offline Installer)

Can I Run Windows 11 without Activating

How to Use Snapchat on PC

How to Delete YouTube Search and Watch History on iPhone

How to Use Energy Saver on Windows 11

Techniqued- Technoloy, Review and Tutorials

© 2021 Techniqued - Technology, Tips, Tricks and Reviews

Navigate Site

  • About Us
  • Advertise with us
  • Contact Us
  • Copyright Policy
  • Disclaimer

Follow Us

No Result
View All Result
  • Android
  • Freewares
  • Tutorial
  • Windows 11
  • macOS

© 2021 Techniqued - Technology, Tips, Tricks and Reviews

This website uses cookies. By continuing to use this website you are giving consent to cookies being used. Visit our Privacy and Cookie Policy.