Techniqued- Technoloy, Review and Tutorials
  • Android
  • Freewares
  • Tutorial
  • Windows 11
  • macOS
No Result
View All Result
Techniqued- Technoloy, Review and Tutorials
  • Android
  • Freewares
  • Tutorial
  • Windows 11
  • macOS
No Result
View All Result
Techniqued- Technoloy, Review and Tutorials
No Result
View All Result

Rearrange and Create Name for Start Screen Groups in Windows 8

Nirmal by Nirmal
March 5, 2012
in Windows 8
1
Share on FacebookShare on Twitter

When it comes to recently released Windows 8  Consumer Preview, the most important feature is obviously the start screen. The new start screen in Windows 8 has metro UI styled apps. One of the good feature of this start screen is that you can rearrange and group the app which are available on the start screen. Grouping is useful if you want quick access to tools when you have large number of apps pinned to start screen.

You can simply click and hold the metro icon and drag and drop the app to move it across the screen. Another nice feature is that you can name the groups and drag and rearrange the apps. For example, you can create a social networking group and add all the apps related to Twitter or Facebook inside it, similarly email and messaging group.

To create a new group, you can click and hold any app and drag it to the open space between two groups. Further, you can add more apps to the group. To create a name for the group, open the start screen and click on the bottom right corner of the screen (you can see a magnifying glass icon).

Zoom icon

This will open the full screen view of the start screen with all apps (zoomed out). Right click on any group (groups separated by space as shown in the image below) and you can see the bottom menu opening up. Click on the option “Name Group”. You can add suitable name for the group.
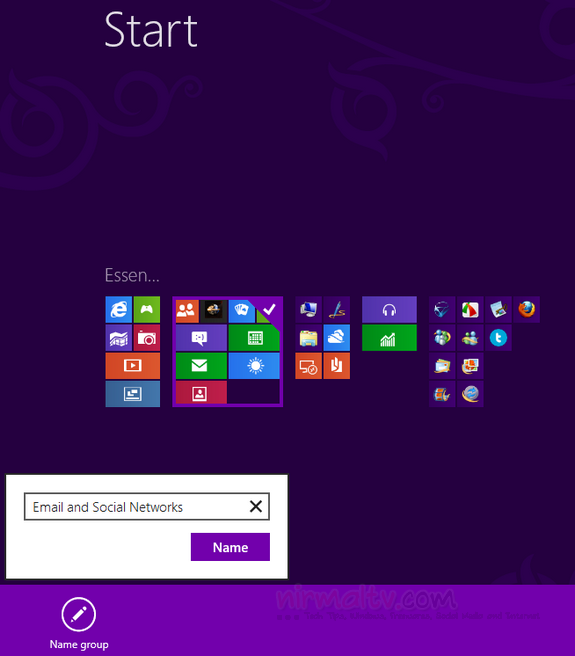
Name Groups

You can do this for all groups. Exit the zoom view and now you can see the groups in the start screen having names.
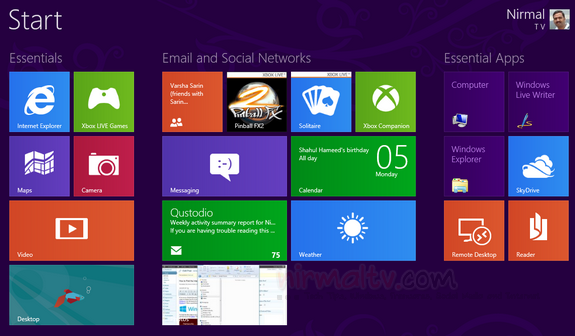
Titles for groups

This feature makes the start screen better organized and easier to use.

Thanks to Caschys for this awesome tip.

Tags: Create GroupsStart ScreenTipsTricksTutorialsWindows 8
ShareTweetSendSend
Previous Post

Free Personal Security Tool for Android and iOS- AirCover

Next Post

Virtually Move Folders in Windows without Breaking Installed Software

Related Posts

Tips and Tricks

Fix DNS Server not Responding Error on Windows 10

March 5, 2021
Windows 10

6 Simple Tips to Improve Battery on Windows 10

March 5, 2021
Windows 10

Where can I Download Windows Legally

April 15, 2020
Tips and Tricks

Fix Mouse not Detected on Windows 10

November 17, 2019
Windows 10

How to Fix USB Device Not Recognized on Windows 10

November 11, 2019
Tutorial

How to Create a Network Bridge in Windows 10

November 11, 2019

Leave a Reply Cancel reply

Your email address will not be published. Required fields are marked *

This site uses Akismet to reduce spam. Learn how your comment data is processed.


Latest Articles

How to Fix “Installation can’t continue” when trying to Update Nvidia Graphics Drivers

Download Windows 11 24H2 ISO (Offline Installer)

Can I Run Windows 11 without Activating

How to Use Snapchat on PC

How to Delete YouTube Search and Watch History on iPhone

How to Use Energy Saver on Windows 11

Techniqued- Technoloy, Review and Tutorials

© 2021 Techniqued - Technology, Tips, Tricks and Reviews

Navigate Site

  • About Us
  • Advertise with us
  • Contact Us
  • Copyright Policy
  • Disclaimer

Follow Us

No Result
View All Result
  • Android
  • Freewares
  • Tutorial
  • Windows 11
  • macOS

© 2021 Techniqued - Technology, Tips, Tricks and Reviews

This website uses cookies. By continuing to use this website you are giving consent to cookies being used. Visit our Privacy and Cookie Policy.