Google had released the latest version of Android, Ice Cream Sandwich (ICS), along with Google Galaxy Nexus phone back in October 2011. The ICS comes with lots of new features, UI and a completely new look. We have already covered many features of ICS on this blog. We will now share a tutorial on how to take a full backup of your phone without having to root or unlock it. The full back up here means full system backup, including app apks, their respective data, as well as the internal storage. Although there is no direct way to do this from the phone’s interface, you can do it using Android SDK tools. We will explain the process in steps. Thanks to XDA Developer Forum member copkay for this detailed tutorial.
Note: Please perform the steps at your own risk, we will not be responsible for any issues caused due to back up process.
Requirements:
- Android SDK installed on your Windows
- Latest version of the ADB platform tools (for Android 4.0+)
- Phone drivers to be installed on PC.
Taking Backup:
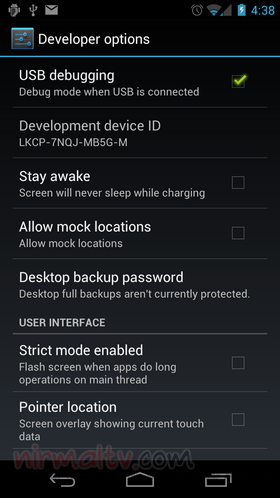
1. In the phone, go to settings and open Developer options. Check the box against USB debugging.

2. Now connect the phone to PC using the USB cable. Navigate to folder where the Android SDK is installed (mostly in program files) and open the folder “platform tools”. Now right click on any vacant space holding the Shift key and then select Open command prompt here. This will open a command prompt. Alternatively, you can simply open the command prompt from start menu and navigate to this folder.
3. Now type the command adb devices to ensure that the device is detected. You will see a serial number as the result, this means the device is connected properly. In case you are seeing any error, you need to re-install the phone drivers based on the phone manufacturer.

4. Now you need to run the command for backup. The command parameters format is:
adb backup [-f <file>] [-apk|-noapk] [-shared|-noshared] [-all] [-system|nosystem] [<packages...>]
The most basic command is adb backup –all. This will default to backup only app and device data (not the APKs themselves) to the current directory as ‘backup.ab’. Other parameters in the command are;
- -f <file> This defines the path where you save the backup
- -apk|-noapk This states whether or not the APKs should be included in the backup or just the apps’ respective data.
- –shared|-noshared This flag is used to enable/disable backup of the device’s shared storage / SD card contents; the default is noshared.
- -all This flag is just an easy way to say to backup ALL apps.
- -system|-nosystem This flag sets whether or not the -all flag also includes system applications or not.
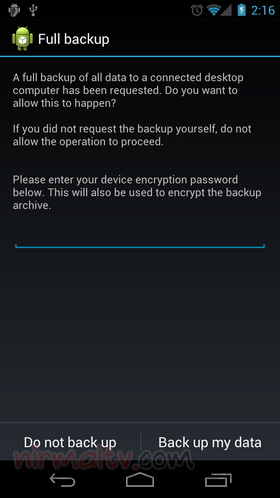
5. So you can choose your commands based on your requirement. I personally used the command adb backup -apk -shared -all -f /GNexusBackup/backup.ab. This means I’m backing up the data to folder GNexusBackup on C drive ( or your default drive) as a file backup.ab. Enter the command on the command prompt and go back to your phone. You can see a new message for Full backup on the phone.


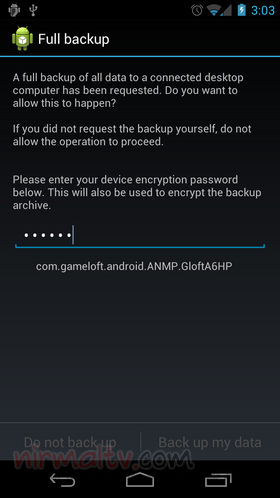
You will be prompted to enter a encryption password for the data backed up. Click on Back up my Data option. This will start the backup process and you can see individual components and apps being copied to PC. Once the backup is complete, you get a message on screen or you can see the command prompt returned. You can open the folder and see the backup file saved.
Restoring the backup:
6. To restore the backup, you need to unlock the bootloader and for this you can use the tool Galaxy Nexus Root Toolkit (if you are using Galaxy Nexus)
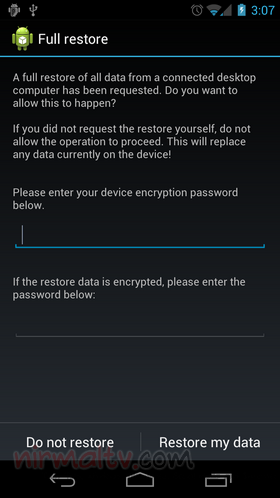
7. After booting the device, connect to USB and then open the command prompt once again and type the command adb restore /GNexusBackup/backup.ab. Now you can see the phone prompting for Full Restore. Type in the encryption password you used to backup and also the restore data password (if used).

8. Click Restore my Data and the process starts. It might take some time based on the amount of files and apps you have backed up.
9. Once complete, you can see your device in the same condition with all the apps and settings working.
Note: Although it might be able to restore the apps and settings, certain widgets as well as SD card files might not be restored. This process will not backup SMS in your phone.
This process should work on all phones running Android ICS (4.0+), we tested it on Galaxy Nexus running ICS 4.0.1


When I originally commented I appear to have clicked on the -Notify me when new comments are added- checkbox and from now on whenever a comment is added I recieve four emails with the same comment. There has to be a way you are able to remove me from that service? Cheers!
This service is from Disqus and not done by the blog. There might be an option for disqus to unsubscribe to comments
hi, i use the restore in order to have all my apps once i rooted, but when i made restore the adb gets stuck in us.mathlab.android, is there a way to skip this app, an continue from there?