Techniqued- Technoloy, Review and Tutorials
  • Android
  • Freewares
  • Tutorial
  • Windows 11
  • macOS
No Result
View All Result
Techniqued- Technoloy, Review and Tutorials
  • Android
  • Freewares
  • Tutorial
  • Windows 11
  • macOS
No Result
View All Result
Techniqued- Technoloy, Review and Tutorials
No Result
View All Result

How to Download All Photos from Google Photos

Nirmal by Nirmal
December 21, 2023
in Tutorial
2
Share on FacebookShare on Twitter

Google Photos is one of the most popular locations to upload and keep your photos. Since most of us use Android phones, Google Photos integration into Android phones is pretty good and you can automatically upload all the photos you have taken using the phone into Google Photos. But what if you want to download all the photos to keep an offline backup? Google does offer the option to download all photos from the Google Photos app. Here is how to do it. Follow this step-by-step tutorial on how to download all photos from Google Photos.

Related Reading: How to Automatically Upload iPhone Photos to Google Photos

Download All Photos from Google Photos

How to Download All Photos from Google Photos: 

Step 1: Open the Google Photos website on your browser and log in with your account.

Step 2: Click on the Settings icon at the top right corner of your account page.

Step 3: Under the settings, scroll down and you will see an option to Export your data. Under this option, there is a link to back up your Google Photos, click on it.

Download All Photos from Google Photos

Step 4: This will take you to the Google Takeout website and you will see that it has automatically selected your Google Photos for backup and download.

Download All Photos from Google Photos

Step 5: Click continue and in the final step, you can choose to export only once or at a regular interval of 2 months for 1 year. You can choose the file type and the maximum file size. If the size of the archive is more than the file size you choose, then it will be split into multiple files.

Download All Photos from Google Photos

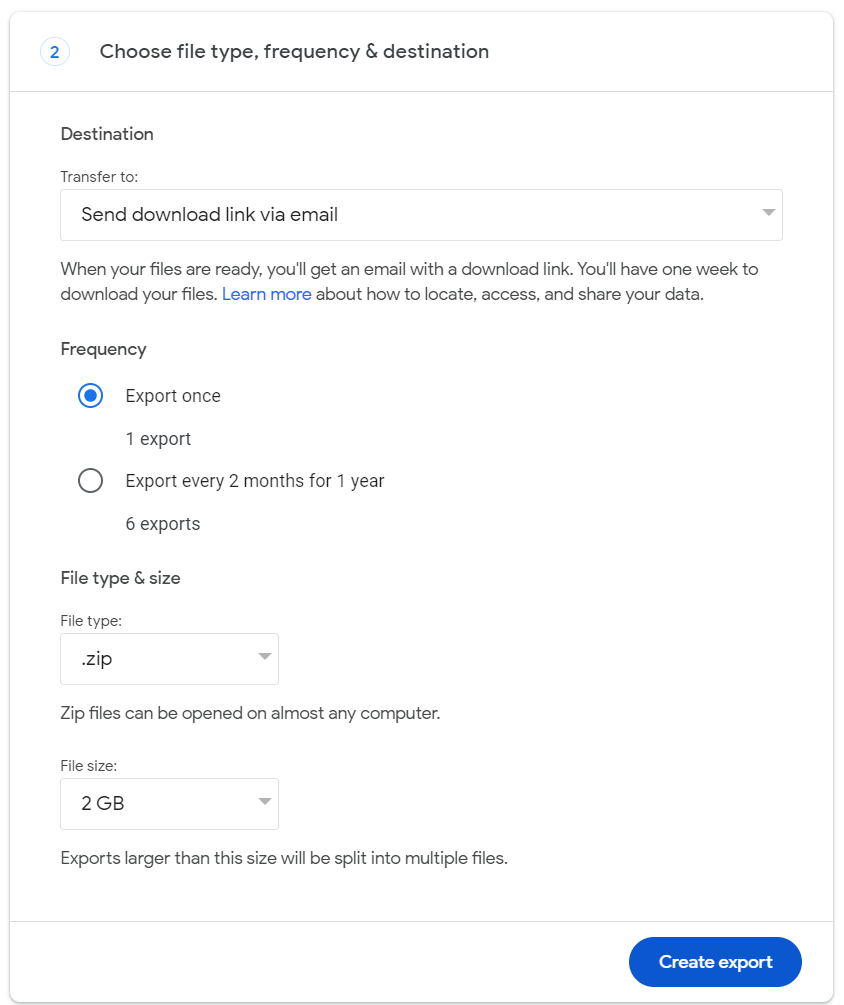
Step 6: In the final step, click on Create Export and Google will do the rest to create the archive with your photos.

Once you have downloaded the photos from Google, you can unzip them and store them locally on a hard disk or any other way.

ShareTweetSendSend
Previous Post

Why Every Android Smartphone User Should Enable Glance Smart Lock Screen On Their Phone

Next Post

Hyundai Bluelink Subscription Cost in India

Related Posts

Tutorial

How to Use Snapchat on PC

May 21, 2024
iOS

How to Delete YouTube Search and Watch History on iPhone

May 18, 2024
Social Networks

How to Change your Name on Facebook [2024]

May 12, 2024
Social Networks

How to Hide likes on Facebook [Tutorial]

May 10, 2024
Tutorial

How to Open a .SWF File with SWF Player

November 23, 2023
Tutorial

5 Ways to Fix Unable to Rename Folders on Windows 11

October 17, 2023

Comments 2

  1. driving directions says:
    1 year ago

    This is, in my opinion, one of the best posts that you have made. Your work is quite outstanding in both quality and quantity. I am grateful to you for it.

    Reply
  2. Green Leather Jackets says:
    1 year ago

    Google Photos is a time-saving app for storing your selected pictures on Google Drive.

    Reply

Leave a Reply Cancel reply

Your email address will not be published. Required fields are marked *

This site uses Akismet to reduce spam. Learn how your comment data is processed.


Latest Articles

How to Fix “Installation can’t continue” when trying to Update Nvidia Graphics Drivers

Download Windows 11 24H2 ISO (Offline Installer)

Can I Run Windows 11 without Activating

How to Use Snapchat on PC

How to Delete YouTube Search and Watch History on iPhone

How to Use Energy Saver on Windows 11

Techniqued- Technoloy, Review and Tutorials

© 2021 Techniqued - Technology, Tips, Tricks and Reviews

Navigate Site

  • About Us
  • Advertise with us
  • Contact Us
  • Copyright Policy
  • Disclaimer

Follow Us

No Result
View All Result
  • Android
  • Freewares
  • Tutorial
  • Windows 11
  • macOS

© 2021 Techniqued - Technology, Tips, Tricks and Reviews

This website uses cookies. By continuing to use this website you are giving consent to cookies being used. Visit our Privacy and Cookie Policy.