Techniqued- Technoloy, Review and Tutorials
  • Android
  • Freewares
  • Tutorial
  • Windows 11
  • macOS
No Result
View All Result
Techniqued- Technoloy, Review and Tutorials
  • Android
  • Freewares
  • Tutorial
  • Windows 11
  • macOS
No Result
View All Result
Techniqued- Technoloy, Review and Tutorials
No Result
View All Result

4 Ways to Take Screenshots in macOS [Ventura]

If you are using a macOS or new to the OS, here is how to take screenshots

Nirmal by Nirmal
October 13, 2022
in macOS, Tutorial
1
Share on FacebookShare on Twitter

macOS is the operating system from Apple running on their Macbooks and iMacs. macOS is now version 13 and it is called Ventura. If you are using a macOS or if you are new to this operating system, you might want to learn the ways to take screenshots or capture the screen and edit your screenshots. There are multiple ways you can take screenshots in macOS and these are using keyboard shortcuts. So here are the 4 ways to take screenshots in macOS.

Related Reading: How to Extend the Life of Macbook’s Battery

Take Screenshots in macOS

4 Ways to Take Screenshots in macOS:

Using different keyboard combinations, you can take screenshots in macOS using different tools.

Option 1: Cmd-Shift-3

If you press Cmd + SHIFT + 3, you will be able to capture the whole screen which is visible to you. This is one of the easiest options to capture screenshots.

Option 2: Cmd-Shift-4 

If you press Cmd + SHIFT + 4, you will be able to see a crosshair on your screen for your mouse and you can easily drag to select a portion of your screen to capture. When you release the mouse button or trackpad the screenshot is taken. If you press the spacebar while in this command, you will be able to see a small camera icon, which you can move over any open window. When you click on your desired window it takes a screenshot of it. A screenshot captured by this method features a white border and a shadow.

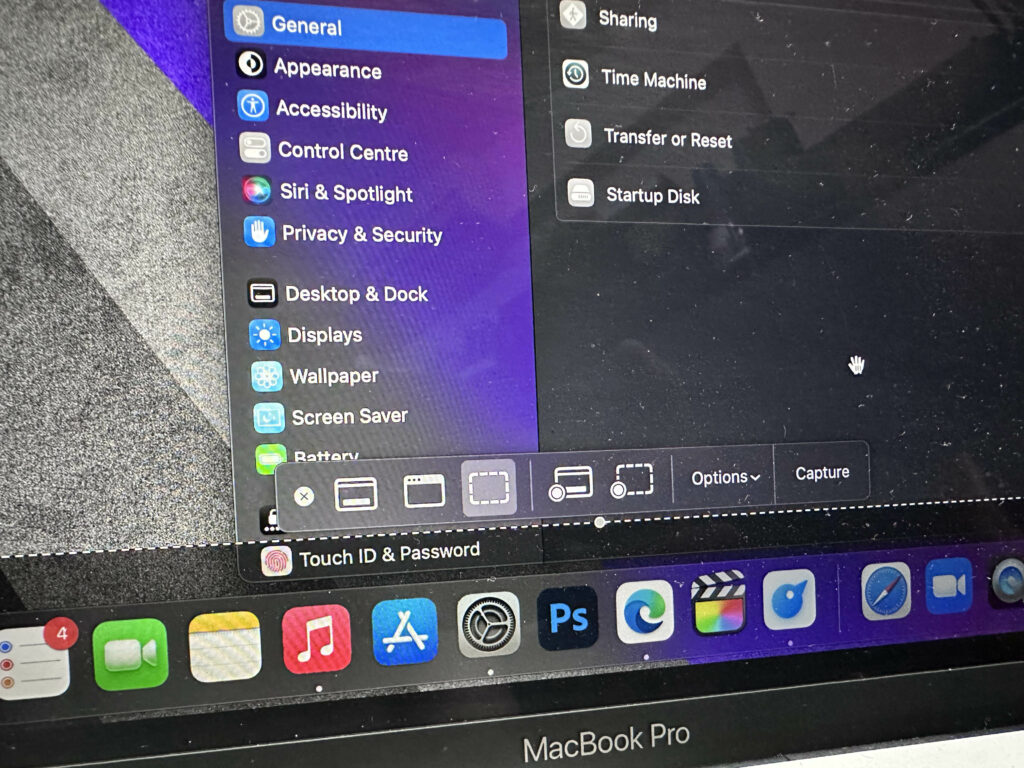
Option 3: Cmd-Shift-5

If you press Cmd + SHIFT + 5, then you will be able to capture the screen with an additional toolbar and options. Here you will be able to capture screenshots with 3 main options- the entire screen, a window, or a selection of your screen. There are also two recording options, one can record your entire screen and the second one can record a selected area. If you press the Escape key, you will exit.

Take Screenshots in macOS

You can also use the edit option to annotate or edit the screenshots you have taken.

By default, screenshots save to your desktop with the name ”Screen Shot [date] at [time].png.”


Tags: How tomacOSScreenshots
ShareTweetSendSend
Previous Post

How to Set CPU Priority Levels on Windows 11

Next Post

How to Sync iCloud Photos in Windows 11 Photo App

Related Posts

Tutorial

How to Use Snapchat on PC

May 21, 2024
iOS

How to Delete YouTube Search and Watch History on iPhone

May 18, 2024
Social Networks

How to Change your Name on Facebook [2024]

May 12, 2024
Social Networks

How to Hide likes on Facebook [Tutorial]

May 10, 2024
Tutorial

How to Download All Photos from Google Photos

December 21, 2023
macOS

How to Reset Network Settings on macOS

November 25, 2023

Leave a Reply Cancel reply

Your email address will not be published. Required fields are marked *

This site uses Akismet to reduce spam. Learn how your comment data is processed.


Latest Articles

How to Fix “Installation can’t continue” when trying to Update Nvidia Graphics Drivers

Download Windows 11 24H2 ISO (Offline Installer)

Can I Run Windows 11 without Activating

How to Use Snapchat on PC

How to Delete YouTube Search and Watch History on iPhone

How to Use Energy Saver on Windows 11

Techniqued- Technoloy, Review and Tutorials

© 2021 Techniqued - Technology, Tips, Tricks and Reviews

Navigate Site

  • About Us
  • Advertise with us
  • Contact Us
  • Copyright Policy
  • Disclaimer

Follow Us

No Result
View All Result
  • Android
  • Freewares
  • Tutorial
  • Windows 11
  • macOS

© 2021 Techniqued - Technology, Tips, Tricks and Reviews

This website uses cookies. By continuing to use this website you are giving consent to cookies being used. Visit our Privacy and Cookie Policy.