Techniqued- Technoloy, Review and Tutorials
  • Android
  • Freewares
  • Tutorial
  • Windows 11
  • macOS
No Result
View All Result
Techniqued- Technoloy, Review and Tutorials
  • Android
  • Freewares
  • Tutorial
  • Windows 11
  • macOS
No Result
View All Result
Techniqued- Technoloy, Review and Tutorials
No Result
View All Result

How to Enter BIOS/ UEFI in Windows 11

Nirmal by Nirmal
June 29, 2022
in Tutorial, Windows 11
0
Share on FacebookShare on Twitter

If you are using a PC, you might have heard of the term BIOS. BIOS (basic input/output system) is the program a computer’s microprocessor uses to start the computer system after it is powered on. So if you want to make any changes to the system boot, you will need to change the BIOS settings. In Windows, there are many ways to enter BIOS or UEFI, here are a few ways to enter BIOS in Windows 11.

How to Enter BIOS in Windows 11:

There are multiple ways to enter BIOS in Windows 11 and one of the options is to use the assigned key while booting the machine this will take you to the BIOS setup. Here are the keys to popular laptop brands.

  • BIOS key for Asus laptops — F2
  • BIOS key for HP laptops — F10 or Esc
  • BIOS key for Lenovo laptops — F2 or Fn + F2
  • BIOS key for Dell laptops — F2 or F12
  • BIOS key for Acer laptops — F2 or DEL
  • BIOS key for Samsung laptops — F2
  • BIOS key for Sony laptops — F1, F2, or F3

Another option to enter BIOS is from the operating system itself. For this, you need to open the Settings panel in Windows 11 and navigate to System-> Recovery.

How to Enter BIOS

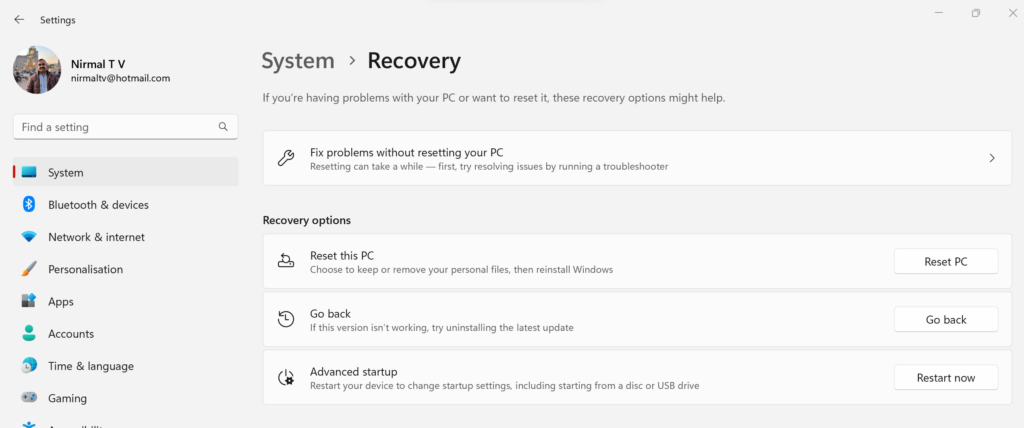
Here you need to click on the Restart now option against the Advanced Startup. The laptop will boot now and it will show a boot menu. Here you need to select Troubleshoot option.

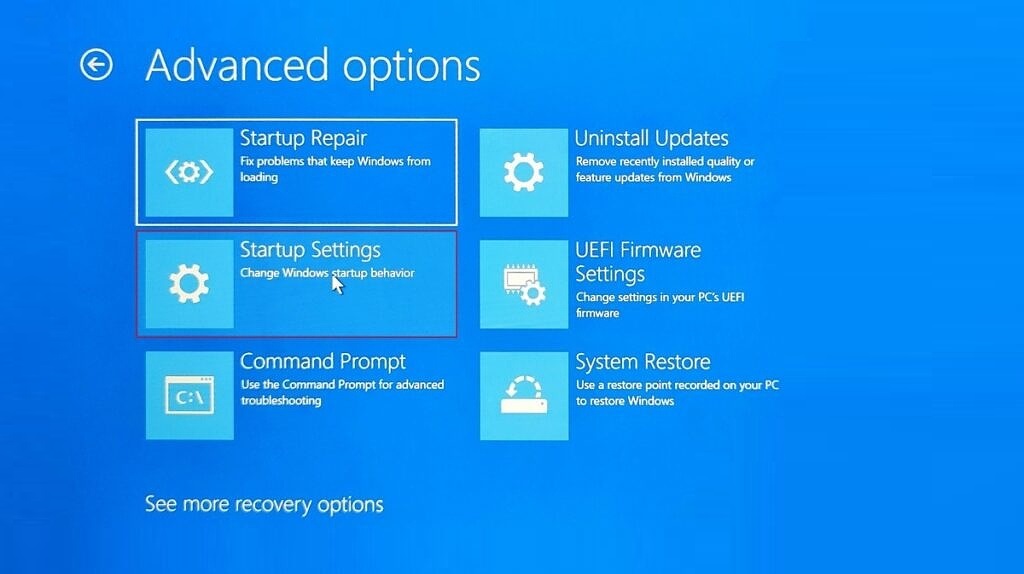
In the next step, in Advanced options, you need to select UEFI firmware settings and this will boot Windows into UEFI settings.

How to Enter BIOS

Another option to access this menu is to restart Windows 11 by pressing and holding the SHIFT key on the keyboard and this process will take you to the same method as mentioned above.

This will take you to the UEFI settings in Windows 11 and here you can make changes to the settings of processor, secure boot, TPM, virtualization, and more.


Tags: BIOSHow toTutorialWindows 11
ShareTweetSendSend
Previous Post

How to Check CPU Temperature in Windows 11

Next Post

How to Enable Different Accent Colors in Windows 11 Theme

Related Posts

Windows 11

How to Fix “Installation can’t continue” when trying to Update Nvidia Graphics Drivers

October 8, 2024
Windows 11

Download Windows 11 24H2 ISO (Offline Installer)

October 7, 2024
Tips and Tricks

Can I Run Windows 11 without Activating

June 14, 2024
Tutorial

How to Use Snapchat on PC

May 21, 2024
iOS

How to Delete YouTube Search and Watch History on iPhone

May 18, 2024
Windows 11

How to Use Energy Saver on Windows 11

May 15, 2024

Leave a Reply Cancel reply

Your email address will not be published. Required fields are marked *

This site uses Akismet to reduce spam. Learn how your comment data is processed.


Latest Articles

How to Fix “Installation can’t continue” when trying to Update Nvidia Graphics Drivers

Download Windows 11 24H2 ISO (Offline Installer)

Can I Run Windows 11 without Activating

How to Use Snapchat on PC

How to Delete YouTube Search and Watch History on iPhone

How to Use Energy Saver on Windows 11

Techniqued- Technoloy, Review and Tutorials

© 2021 Techniqued - Technology, Tips, Tricks and Reviews

Navigate Site

  • About Us
  • Advertise with us
  • Contact Us
  • Copyright Policy
  • Disclaimer

Follow Us

No Result
View All Result
  • Android
  • Freewares
  • Tutorial
  • Windows 11
  • macOS

© 2021 Techniqued - Technology, Tips, Tricks and Reviews

This website uses cookies. By continuing to use this website you are giving consent to cookies being used. Visit our Privacy and Cookie Policy.