Techniqued- Technoloy, Review and Tutorials
  • Android
  • Freewares
  • Tutorial
  • Windows 11
  • macOS
No Result
View All Result
Techniqued- Technoloy, Review and Tutorials
  • Android
  • Freewares
  • Tutorial
  • Windows 11
  • macOS
No Result
View All Result
Techniqued- Technoloy, Review and Tutorials
No Result
View All Result

How to Enable HTTPS Only Mode in Chrome

Nirmal by Nirmal
November 22, 2021
in Chrome, Tips and Tricks
0
Share on FacebookShare on Twitter

We have seen how the internet has evolved over the last couple of decades and now one of the most important aspects of browsing is HTTPS. While HTTP was commonly used a few years back, now almost all websites are moving to HTTPS. The difference between the two protocols is that HTTPS uses TLS (SSL) to encrypt normal HTTP requests and responses. As a result of this encryption, HTTPS is far more secure than HTTP. Google Chrome, the most popular website browser, also has an option to enable HTTPS only mode in Chrome. Let’s see how this works.

Enable HTTPS Only Mode in Chrome


How to Enable HTTPS Only Mode in Chrome:

The latest version of Google Chrome has an option to enable HTTPS for all websites or rather use HTTPS while browsing the web using Chrome. You need to make sure that you have updated the browser to the latest version.

Step 1: Open the Google Chrome web browser.

Step 2: Click on the three dots at the top right corner and select Settings.
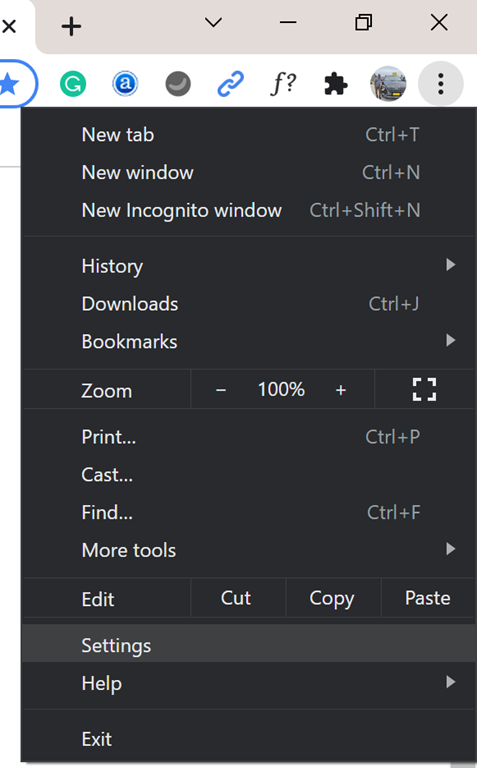
Enable HTTPS Only Mode in Chrome

Step 3: In the settings menu, select the Privacy and Security menu from the left side options.
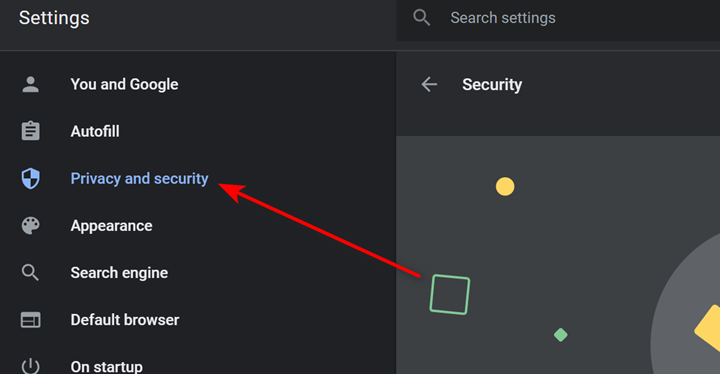
Privacy and safety

Step 4: Under the Privacy and Security options, scroll down and you will see an option “Always use secure connection” listed under Advanced settings.

Enable https

Step 5: You need to enable this option and once enabled, Chrome will force HTTPS connection for all the websites which have HTTPS and it will warn you of any websites which do not have HTTPS whenever you open websites using Chrome.

Tags: Google ChromeTipsTricks
ShareTweetSendSend
Previous Post

How to Easily Import Pictures from iPhone to Windows 11 PC

Next Post

5 Best Leather Cases for iPhone 13 Series

Related Posts

Tips and Tricks

Can I Run Windows 11 without Activating

June 14, 2024
Social Networks

How to Change your Instagram Name

May 12, 2024
Social Networks

How To View Your Instagram Reels Watch History

May 11, 2024
Social Networks

How To Post Longer Videos On Instagram

May 6, 2024
Social Networks

How to Find Who Unfollowed you on Instagram

December 9, 2023
Chrome

How to Check Memory Usage of Tabs in Google Chrome

December 7, 2023

Leave a Reply Cancel reply

Your email address will not be published. Required fields are marked *

This site uses Akismet to reduce spam. Learn how your comment data is processed.


Latest Articles

How to Fix “Installation can’t continue” when trying to Update Nvidia Graphics Drivers

Download Windows 11 24H2 ISO (Offline Installer)

Can I Run Windows 11 without Activating

How to Use Snapchat on PC

How to Delete YouTube Search and Watch History on iPhone

How to Use Energy Saver on Windows 11

Techniqued- Technoloy, Review and Tutorials

© 2021 Techniqued - Technology, Tips, Tricks and Reviews

Navigate Site

  • About Us
  • Advertise with us
  • Contact Us
  • Copyright Policy
  • Disclaimer

Follow Us

No Result
View All Result
  • Android
  • Freewares
  • Tutorial
  • Windows 11
  • macOS

© 2021 Techniqued - Technology, Tips, Tricks and Reviews

This website uses cookies. By continuing to use this website you are giving consent to cookies being used. Visit our Privacy and Cookie Policy.