Techniqued- Technoloy, Review and Tutorials
  • Android
  • Freewares
  • Tutorial
  • Windows 11
  • macOS
No Result
View All Result
Techniqued- Technoloy, Review and Tutorials
  • Android
  • Freewares
  • Tutorial
  • Windows 11
  • macOS
No Result
View All Result
Techniqued- Technoloy, Review and Tutorials
No Result
View All Result

How to Enable Wi-Fi Sync for iPhone on macOS

You can enable Wi-Fi sync for your iPhone on macOS and sync files easily

Nirmal by Nirmal
August 22, 2021
in iOS, macOS
0
Share on FacebookShare on Twitter

One of the good aspects about Apple products is how they are closely knit in the ecosystem. If you are an Apple iPhone or iPad and macOS user, you might be knowing how seamless the experience it, whether it is transfering files or getting calling on macOS. While you can sync your iPhone with macOS using the cable, it might not be an easy process for all users. But thankfully macOS also provides an option to enable Wi-Fi sync for your iPhone on macOS.

How to Enable Wi-Fi Sync for iPhone on macOS:

The process to enable the Wi-Fi sync is pretty simple, all you need to have is both the iPhone and macOS should be connected to same Wi-Fi network.

Step 1: Turn on your macOS and connect your iPhone to macOS with the cable.

Step 2: In the Finder, you will be able to see iPhone connected to the macOS.

Step 3: In the iPhone, you will get a notification to Trust the computer. Click on Trust the PC and you will get the same notification on macOS.

Step 4: Now click on the iPhone in the Finder and this will show all the details of your iPhone.

Step 5: In the General tab, you will be able to see an option “Show this iPhone when on Wi-Fi” under the options sub group.

Enable Wi-Fi Sync for iPhone on macOS

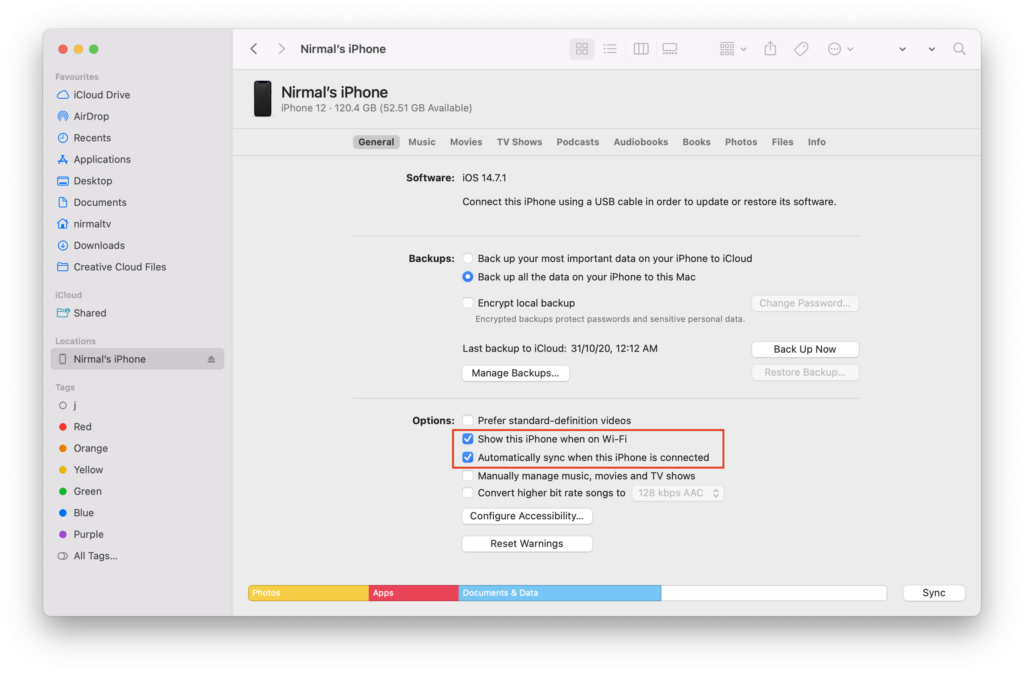
Step 6: You can also turn on “Automatically sync when this iPhone is connected”

Step 7: Now save all the changes you have made.

Step 8: Now if you disconnect the cable, you will still be able to see the iPhone in the Finder.

While the Wi-Fi sync is a pretty useful feature, you cannot restore iOS on iPhone or iPad using this feature and that will still require you to connect the USB cable. This feature is also available on Windows as well.

Tags: Apple iPhonemacOS
ShareTweetSendSend
Previous Post

How to Quickly Close Apps in macOS

Next Post

5 Sites to Download Movie Subtitles for Free

Related Posts

iOS

How to Delete YouTube Search and Watch History on iPhone

May 18, 2024
Apple iPhone

How to Restore Deleted Apps in iPhone and iPad

April 2, 2024
macOS

How to Reset Network Settings on macOS

November 25, 2023
Apple iPhone

How to Hide Apps on iPhone (iOS17)

November 8, 2023
macOS

3 Easy Ways to Switch User Accounts in macOS Sonoma

October 27, 2023
macOS

How to Enable Game Mode on macOS Sonoma

October 16, 2023

Leave a Reply Cancel reply

Your email address will not be published. Required fields are marked *

This site uses Akismet to reduce spam. Learn how your comment data is processed.


Latest Articles

How to Fix “Installation can’t continue” when trying to Update Nvidia Graphics Drivers

Download Windows 11 24H2 ISO (Offline Installer)

Can I Run Windows 11 without Activating

How to Use Snapchat on PC

How to Delete YouTube Search and Watch History on iPhone

How to Use Energy Saver on Windows 11

Techniqued- Technoloy, Review and Tutorials

© 2021 Techniqued - Technology, Tips, Tricks and Reviews

Navigate Site

  • About Us
  • Advertise with us
  • Contact Us
  • Copyright Policy
  • Disclaimer

Follow Us

No Result
View All Result
  • Android
  • Freewares
  • Tutorial
  • Windows 11
  • macOS

© 2021 Techniqued - Technology, Tips, Tricks and Reviews

This website uses cookies. By continuing to use this website you are giving consent to cookies being used. Visit our Privacy and Cookie Policy.