Techniqued- Technoloy, Review and Tutorials
  • Android
  • Freewares
  • Tutorial
  • Windows 11
  • macOS
No Result
View All Result
Techniqued- Technoloy, Review and Tutorials
  • Android
  • Freewares
  • Tutorial
  • Windows 11
  • macOS
No Result
View All Result
Techniqued- Technoloy, Review and Tutorials
No Result
View All Result

How to Use Night Light Feature in Windows 10 (Creators Update)

Nirmal by Nirmal
April 7, 2017
in Tutorial, Windows 10
2
Share on FacebookShare on Twitter

Windows 10 latest update, the Creators Update will be available for download from April 11th and this update brings in new features and tools to Windows 10 users. One of the new additions is Night Light feature which allows users to control the display temperature by making it warmer or colder. This feature is already available in most of the smartphones and by using Night Light feature, you can make the display less strain to the eyes in the night especially when you are reading using your laptop or desktop.

So in this article, we will show you how to use the Night Light feature in Windows 10.

To use the Night Light feature, open Settings in Windows 10 and navigate to System-> Display. Here, under the Brightness and color, you will see a slider for Night Light.
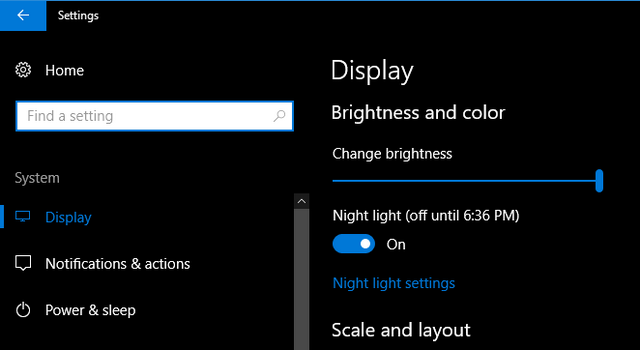
Night Light

You can turn on the Night Light feature and below you will find a link to configure the Night Light. Night Light will be automatically configured to turn on at sunset and it will show the time of sunset. But you can also manually turn it on using the button below. There is also option to set the color temperature of the display during night. You can select a warmer or colder temperature based on your requirement.
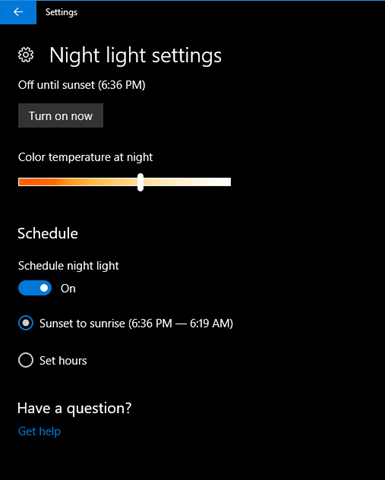
Night Light settings

Alternatively, there is also option to schedule the Night light feature either from sunset to sunrise or setting the hours manually. You can set the start and end time for Night light using the option available.

Schedule night light

Night Light is a new feature in Windows 10 Creators update which helps users to reduce the eye strain if you are working long hours on your laptop or desktop in the night. This is also useful if you are reading using Windows 10 laptop or tablet.

So, if you have upgraded to Creators Update, try out this new feature.

Tags: Night LightTutorialsWindows 10
ShareTweetSendSend
Previous Post

5 Best Gmail Clients for Android

Next Post

How to Download and Install Windows 10 Themes from Windows Store

Related Posts

Tutorial

How to Use Snapchat on PC

May 21, 2024
iOS

How to Delete YouTube Search and Watch History on iPhone

May 18, 2024
Social Networks

How to Change your Name on Facebook [2024]

May 12, 2024
Social Networks

How to Hide likes on Facebook [Tutorial]

May 10, 2024
Tutorial

How to Download All Photos from Google Photos

December 21, 2023
Tutorial

How to Open a .SWF File with SWF Player

November 23, 2023

Comments 2

  1. TTGADGET says:
    8 years ago

    amazing feature help me when i work for long time thank you

    Reply
  2. wamuz says:
    8 years ago

    Nice thumbs up to Microsoft Corporation. Great feature

    Reply

Leave a Reply Cancel reply

Your email address will not be published. Required fields are marked *

This site uses Akismet to reduce spam. Learn how your comment data is processed.


Latest Articles

How to Fix “Installation can’t continue” when trying to Update Nvidia Graphics Drivers

Download Windows 11 24H2 ISO (Offline Installer)

Can I Run Windows 11 without Activating

How to Use Snapchat on PC

How to Delete YouTube Search and Watch History on iPhone

How to Use Energy Saver on Windows 11

Techniqued- Technoloy, Review and Tutorials

© 2021 Techniqued - Technology, Tips, Tricks and Reviews

Navigate Site

  • About Us
  • Advertise with us
  • Contact Us
  • Copyright Policy
  • Disclaimer

Follow Us

No Result
View All Result
  • Android
  • Freewares
  • Tutorial
  • Windows 11
  • macOS

© 2021 Techniqued - Technology, Tips, Tricks and Reviews

This website uses cookies. By continuing to use this website you are giving consent to cookies being used. Visit our Privacy and Cookie Policy.