Techniqued- Technoloy, Review and Tutorials
  • Android
  • Freewares
  • Tutorial
  • Windows 11
  • macOS
No Result
View All Result
Techniqued- Technoloy, Review and Tutorials
  • Android
  • Freewares
  • Tutorial
  • Windows 11
  • macOS
No Result
View All Result
Techniqued- Technoloy, Review and Tutorials
No Result
View All Result

How to Root and Unroot Xiaomi Redmi Note

Nirmal by Nirmal
November 17, 2019
in Mobile Phones, Tutorial
1
Share on FacebookShare on Twitter

Xiaomi announced the new Redmi Note in India and it is available exclusively on Flipkart for Rs 8999. The device comes with a 5.5 inch HP display with IPS technology and is powered by a 1.7Ghz Octa Core processor with Mali 450GPU. The device has 2GB of RAM and also comes with 8GB internal storage which is expandable to 32GB via microSD card. The phone also comes with a 13MP rear camera with LED flash and 1080p recording. The phone also features a 5MP camera for video calls and Selfie. It runs on Android 4.2.2 Jelly Bean with MIUI which is a custom UI from the company. The phone is powered by a 3200mAh battery.

We recently did the unboxing of the device and also shared our first impressions. In case you want to root the device and have better control, you can do that as Xiaomi officially supports rooting and it will not void the warranty of your phone. So here is a quick tutorial on how to root Xiaomi Redmi Note.

root unroot

How to Root Xiaomi Redmi Note:

1. To get started with rooting, download this file.

2. Now copy this file to the internal storage of your device.

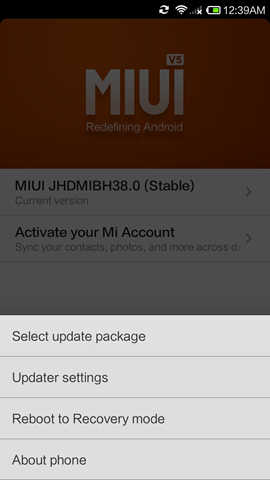
3. Open the updater app on your device and then select the options.

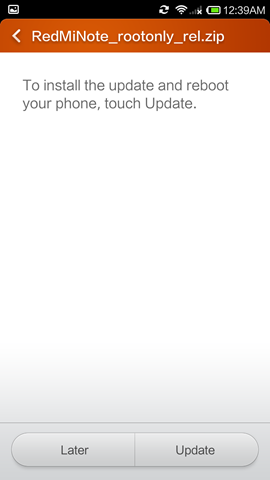
4. Here you will see the option called “Select Update Package”. Now browse to the file where you have copied and select it.
Screenshot_2014-12-09-00-39-39Screenshot_2014-12-09-00-39-50

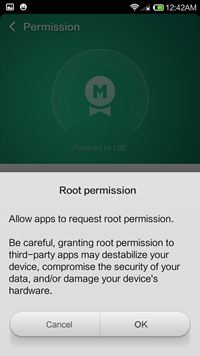
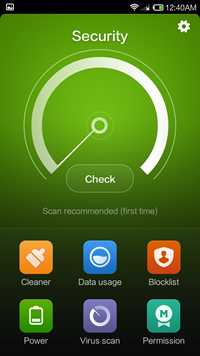
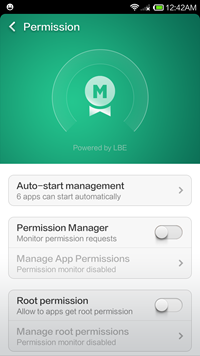
5. Now wait for the update to complete and reboot the device. Once the phone reboots, open the security app and then go to permission. Here you need to enable the option Root Permission. You will be asked a warning, click OK.
Screenshot_2014-12-09-00-40-08Screenshot_2014-12-09-00-42-30Screenshot_2014-12-09-00-42-36

6. That’s it, your device is now rooted.

How to Unroot Xiaomi Redmi Note:

If you ever want to bring the device to original state (non-rooted), just download this file and then follow the same process as above. Once you have installed the update, you phone will be back to normal and it will be unrooted.

Via

Tags: How toTutorialsXiaomi Redmi Note
ShareTweetSendSend
Previous Post

Lava Iris Win1 Unboxing and First Impressions

Next Post

How to Install Android Lollipop on Windows

Related Posts

Tutorial

How to Use Snapchat on PC

May 21, 2024
iOS

How to Delete YouTube Search and Watch History on iPhone

May 18, 2024
Social Networks

How to Change your Name on Facebook [2024]

May 12, 2024
Social Networks

How to Hide likes on Facebook [Tutorial]

May 10, 2024
Tutorial

How to Download All Photos from Google Photos

December 21, 2023
Tutorial

How to Open a .SWF File with SWF Player

November 23, 2023

Comments 1

  1. Saw says:
    10 years ago

    It is So Long to root .

    Reply

Leave a Reply Cancel reply

Your email address will not be published. Required fields are marked *

This site uses Akismet to reduce spam. Learn how your comment data is processed.


Latest Articles

How to Fix “Installation can’t continue” when trying to Update Nvidia Graphics Drivers

Download Windows 11 24H2 ISO (Offline Installer)

Can I Run Windows 11 without Activating

How to Use Snapchat on PC

How to Delete YouTube Search and Watch History on iPhone

How to Use Energy Saver on Windows 11

Techniqued- Technoloy, Review and Tutorials

© 2021 Techniqued - Technology, Tips, Tricks and Reviews

Navigate Site

  • About Us
  • Advertise with us
  • Contact Us
  • Copyright Policy
  • Disclaimer

Follow Us

No Result
View All Result
  • Android
  • Freewares
  • Tutorial
  • Windows 11
  • macOS

© 2021 Techniqued - Technology, Tips, Tricks and Reviews

This website uses cookies. By continuing to use this website you are giving consent to cookies being used. Visit our Privacy and Cookie Policy.